Difference between revisions of "ENA Configuration - AlphaCom mode"
From Zenitel Wiki
(→Quick getting started guide) |
(→Quick getting started guide) |
||
| Line 11: | Line 11: | ||
<br> | <br> | ||
The Directory Number must also be [[#Configuration_of_the_AlphaCom_server|defined in the AlphaCom Server]] using the AlphaPro configuration tool. | The Directory Number must also be [[#Configuration_of_the_AlphaCom_server|defined in the AlphaCom Server]] using the AlphaPro configuration tool. | ||
| + | |||
| + | == The station web interface== | ||
| + | {{Note}} The user interface and parameters displayed in the following sections are dependent on the Turbine station type (Compact, Industrial or Ex) selected. | ||
| + | |||
| + | === Station Main tab=== | ||
| + | ==== Station Information ==== | ||
| + | *[[Logging into an IP Station|Log In to the station]] | ||
| + | *The '''Station Information''' page will now be displayed, showing the IP station configuration and status. | ||
| + | [[File:Turbine StationInfo.PNG|thumb|left|500px|The '''Station Information''' page]] | ||
| + | <br style="clear:both;" /> | ||
| + | |||
| + | ====Main Settings==== | ||
| + | * Click '''Station Main > Main Settings''' to access the page for configuring station mode and IP parameters. | ||
| + | [[File:AC-MainSettings.PNG|thumb|left|500px]] | ||
| + | <br style="clear:both;" /> | ||
| + | |||
| + | '''Station Mode:''' Select the '''Use Alphacom''' radio-button. | ||
| + | |||
| + | '''Product Model And Accessory:''' Depending on the type of Turbine hardware, there are different Product models and accessories to choose from. Find your model here: [[:Category:Turbine|Turbine Station Models]] | ||
| + | |||
| + | '''Registration Settings:''' | ||
| + | * '''AlphaCom IP-address''': Enter the IP address of the AlphaCom server to which the IP station is to be registered | ||
| + | * '''Directory Number''': Enter the directory number of the station. This must match the directory number defined in the AlphaCom server | ||
| + | ::- If a directory number is not entered, the station will register with its MAC address. The MAC address is found on the '''Station Information''' page and needs to be entered in the AlphaCom server using the AlphaPro PC tool | ||
| + | |||
| + | '''IP Settings:''' | ||
| + | * '''DHCP''' – Select this option if the IP station shall receive IP Settings from a DHCP server. | ||
| + | * '''Static IP''' – Select this option if the IP station shall use a static IP address. Enter values for: | ||
| + | ::- '''IP-address''' | ||
| + | ::- '''Subnet-mask''' | ||
| + | ::- '''Gateway''' | ||
| + | ::- '''DNS Server 1''' (option for network administration) | ||
| + | ::- '''DNS Server 2''' (option for network administration) | ||
| + | ::- '''Hostname''' (option for network administration) | ||
| + | |||
| + | *'''Read IP Address:''' Check the '''Read IP Address''' box to enable an unregistered station to speak the IP address when the call button is pressed. "Read IP Address" is default enabled. | ||
| + | |||
| + | *'''Enable RSTP''' (for Industrial & Ex stations): Check the '''Enable RSTP''' box to enable RSTP. RSTP is only required when using redundant networking | ||
| + | |||
| + | *'''Ethernet Speed 10 Mbits/s''': Default Ethernet speed is 100 Mbit/s unless switch is configured to 10 Mbit/s | ||
| + | |||
| + | |||
| + | Click '''Save''' followed by '''Apply''' to apply the new configuration settings. | ||
| + | |||
| + | === Station Administration tab=== | ||
| + | |||
| + | ====Reboot ==== | ||
| + | * '''Reboot system''': Perform a full Linux reboot. No configuration is lost | ||
| + | * '''Reboot main application''': Perform a restart of the intercom application. No configuration is lost | ||
| + | * '''Factory reset''': Set all parameters to Factory Default values. The station will get static IP Address 169.254.1.100. | ||
| + | * '''Factory reset with DHCP''': Set all parameters to Factory Default values. The station will get IP Address from DHCP server. If no DHCP server in the network, it will get a random 169.254.x.x IP address. | ||
| + | * '''Clear local ZAP profile''': Not used in AlphaCom mode | ||
| + | * '''Delete ZAP data.lua''': Not used in AlphaCom mode | ||
| + | |||
| + | ==== Logging ==== | ||
| + | From the web interface of the station it is possible to activate logging, which can be useful for debugging and troubleshooting purposes. See [[Logging - IP Stations|Logging - IP Stations]] for more information. | ||
| + | |||
| + | ==== Change Password ==== | ||
| + | The password for web access and for accessing the display setup menus can be changed, see [[Password (IP Stations)]]. | ||
| + | |||
| + | ==== Backup and Restore ==== | ||
| + | From the web interface of the station it is possible to backup and restore the configuration data. See [[Backup and Restore (IP Stations)|Backup and Restore]] for more information. | ||
| + | |||
| + | ==== Manual Upgrade ==== | ||
| + | The software of the station can be upgraded via the web interface. see [[Turbine_Software_Upgrade]] for details. | ||
| + | |||
| + | |||
| + | === Advanced AlphaCom tab=== | ||
| + | ====Audio ==== | ||
| + | To configure audio settings select '''Advanced Alphacom > Audio''' from the menu | ||
| + | [[File:Turbine config 4.PNG|thumb|left|500px]] | ||
| + | <br style="clear:both;" /> | ||
| + | |||
| + | * Select or set values for the parameters: | ||
| + | ::- Volume Override Level | ||
| + | ::- Microphone Sensitivity | ||
| + | ::- Automatic Volume Control | ||
| + | ::- Debug Automatic Volume Control | ||
| + | ::- Conversation Mode | ||
| + | ::- Audio profile | ||
| + | ::- Audio source | ||
| + | ::- Line Out Source | ||
| + | |||
| + | '''Volume Override Level:''' Select the Volume Override Level in the range 0 to 8 from the drop-down box. The default setting is 8. This setting determines the volume to be used in the station when receving audio and the Volume Override feature is activated, see [[Volume and handset override|Volume Override]] for more details. | ||
| + | |||
| + | '''Microphone Sensitivity:''' Select the sensitivity level in the range 0 to 7 from the drop-down box. The default setting is 5. If used as a local PA panel, a setting in the 1 to 3 range will reduce the chance of acoustic feedback (howling) | ||
| + | |||
| + | '''Volume Control Ch1 & Ch2:''' Offset Gain (default routed to Amplifier/Speaker). Valid range: -62 to +24 dB | ||
| + | '''NOTE!''This feature must be used with caution as incorrect settings may severely degrade the performance of the echo-cancelling algorithm.''''' | ||
| + | |||
| + | '''Automatic Volume Control:''' Check the box to enable automatic volume control that is adjusted according to the noise level | ||
| + | |||
| + | '''Debug Automatic Volume Control:''' Check the box to show current volume level on [[OLED Labels|OLED]] display | ||
| + | |||
| + | '''Conversation Mode:''' | ||
| + | For this parameter, there are five options: | ||
| + | ::''' Full Open Duplex''': Normal mode with echo cancellation. | ||
| + | ::''' Robust Duplex''': Option used when open duplex fails due to excessive speaker loudness, microphone overload or very high nonlinear distortions. | ||
| + | ::''' Half Duplex Switching''': Switches speech direction depending on who speaks the loudest. | ||
| + | ::''' Push-To-Talk''': Half-duplex communication. Initially the microphone is shut off. Push the M-button to open the microphone, and release to listen. (Only applicable to stations with M-key) | ||
| + | ::''' Open''': Full Open Duplex without echo cancellation | ||
| + | |||
| + | '''Audio Profile:''' | ||
| + | This parameter has the following options: | ||
| + | :: '''Normal''' | ||
| + | :: '''Noisy Environment''' | ||
| + | :: '''Very Noisy Environment''' | ||
| + | :: '''Advanced'''. ''Note!'': Advanced options are for experienced users only! Incorrect settings may severely degrade the acoustic performance and intelligibility. Use with care! | ||
| + | :: See [[Turbine Audio Profiles]] for more details | ||
| + | |||
| + | '''Audio Source:''' | ||
| + | This parameter has the following options: | ||
| + | :: '''Normal Microphone''' | ||
| + | :: '''Line In''' (for Turbine Extended intercoms only) | ||
| + | |||
| + | '''Line Out Source:''' | ||
| + | Let you choose if the '''Speaker''' signal (the VoIP stream from AlphaCom) also should be played on the '''Line Out''' output, or if the '''Microphone''' signal should be routed to the Line Out output. | ||
| + | |||
| + | When used with an external amplifier (and speakers), use '''Speaker'''. When using the built-in microphone as an input to another system, use '''Microphone'''. | ||
| + | |||
| + | ====I/O Settings==== | ||
| + | These settings let you choose if an I/O should be used as an Input or as an Output. By default all I/O's are set as Inputs. | ||
| + | * Select '''Advanced AlphaCom > I/O Settings''' from the menu | ||
| + | [[File:TCIS Configuration-8.PNG|thumb|left|500px]] | ||
| + | <br style="clear:both;" /> | ||
| + | |||
| + | * Select either '''Input''' or '''Output''' options from the drop-down box for '''I/O Pins''' 1 to 6. | ||
| + | |||
| + | See also the article [[Turbine Inputs and Outputs in AlphaCom]]. | ||
| + | |||
| + | ====OLED Labels==== | ||
| + | See article [[OLED Labels]] on how to configure the display in the station models [[TCIS-4]] and [[TCIS-5]]. | ||
| + | |||
| + | ====Address Book==== | ||
| + | See the article [[Address Book]] on how to configure the address book of the station models [[TCIS-6]] and [[TCIV-6]]. | ||
| + | |||
| + | ====Keyboard Settings==== | ||
| + | Applies to the station models TFIE-x (Industrial station) and TFIX-x (Explosion proof station). See article [[TFIE Keyboard Settings]] for more details. | ||
| + | |||
| + | ====Sound Detection==== | ||
| + | The Sound Detection, also known as Voice Activity Detection (VAD) samples the audio level from the microphone located in the IP Station. If the audio level meets defined criterias an action in AlphaCom can be triggered. | ||
| + | |||
| + | Read more about [[Sound Detection]]. | ||
| + | |||
| + | ====Time Settings==== | ||
| + | * Select '''Advanced AlphaCom > Time Settings''' from the menu | ||
| + | [[File:Turbine config 5.PNG|thumb|left|500px]] | ||
| + | <br style="clear:both;" /> | ||
| + | |||
| + | '''Time Settings:''' You can enable Network Time Protocol, select the time zone and set the hostname or the IP address of the NTP server. | ||
| + | |||
| + | === Advanced Network tab === | ||
| + | ==== SNMP ==== | ||
| + | A set of SNMP functions are available in the IP station. SNMP (Simple Network Management Protocol) is a protocol for centralizing the management of devices in IP networks. | ||
| + | |||
| + | See [[SNMP Settings (Pulse/SIP)|SNMP Settings]] for futher information. | ||
| + | |||
| + | ==== 802.1X ==== | ||
| + | IEEE 802.1X is an IEEE Standard for port-based Network Access Control (PNAC). It provides an authentication mechanism to devices wishing to attach to a LAN, either establishing a point-to-point connection or preventing it if authentication fails. For details on configuration, see [[IEEE 802.1X]]. | ||
| + | |||
| + | ==== Firewall ==== | ||
| + | All IP Stations have an embedded firewall. See [[Firewall (IP Stations)|Firewall]] for details. | ||
| + | |||
| + | |||
| + | ---- | ||
| + | |||
| + | |||
Revision as of 11:54, 22 March 2018
 THIS ARTICLE IS UNDER CONSTRUCTION !!!
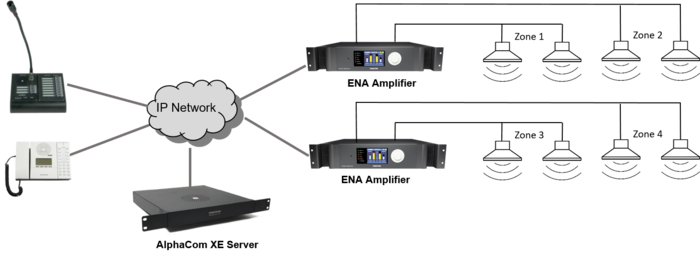
This article describes the configuration required for a Exigo Network Amplifier (ENA) to operate with an AlphaCom server. The ENA Amplifiers are configured through their web interface. The AlphaCom server is configured using the PC tool AlphaPro.
Contents
Quick getting started guide
To make an ENA Amplifier operational there are essentially four parameters to set in the web interface of the amplifier. Log In to the amplifier, go to Station Main > Main Settings, and:
- Set Station Mode = "Use AlphaCom"
- Configure the IP Settings (IP address) of the amplifier
- Enter the AlphaCom IP-address
- Enter Ch1 Directory Number
The Directory Number must also be defined in the AlphaCom Server using the AlphaPro configuration tool.
The station web interface
The user interface and parameters displayed in the following sections are dependent on the Turbine station type (Compact, Industrial or Ex) selected.
Station Main tab
Station Information
- Log In to the station
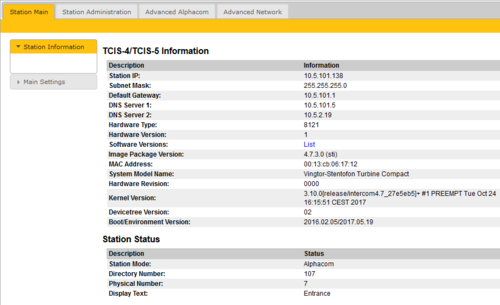
- The Station Information page will now be displayed, showing the IP station configuration and status.
Main Settings
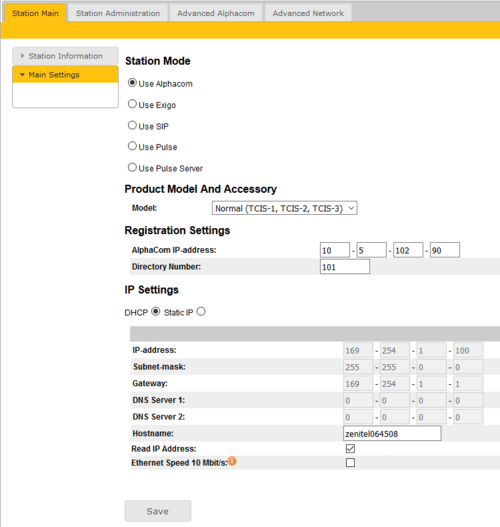
- Click Station Main > Main Settings to access the page for configuring station mode and IP parameters.
Station Mode: Select the Use Alphacom radio-button.
Product Model And Accessory: Depending on the type of Turbine hardware, there are different Product models and accessories to choose from. Find your model here: Turbine Station Models
Registration Settings:
- AlphaCom IP-address: Enter the IP address of the AlphaCom server to which the IP station is to be registered
- Directory Number: Enter the directory number of the station. This must match the directory number defined in the AlphaCom server
- - If a directory number is not entered, the station will register with its MAC address. The MAC address is found on the Station Information page and needs to be entered in the AlphaCom server using the AlphaPro PC tool
IP Settings:
- DHCP – Select this option if the IP station shall receive IP Settings from a DHCP server.
- Static IP – Select this option if the IP station shall use a static IP address. Enter values for:
- - IP-address
- - Subnet-mask
- - Gateway
- - DNS Server 1 (option for network administration)
- - DNS Server 2 (option for network administration)
- - Hostname (option for network administration)
- Read IP Address: Check the Read IP Address box to enable an unregistered station to speak the IP address when the call button is pressed. "Read IP Address" is default enabled.
- Enable RSTP (for Industrial & Ex stations): Check the Enable RSTP box to enable RSTP. RSTP is only required when using redundant networking
- Ethernet Speed 10 Mbits/s: Default Ethernet speed is 100 Mbit/s unless switch is configured to 10 Mbit/s
Click Save followed by Apply to apply the new configuration settings.
Station Administration tab
Reboot
- Reboot system: Perform a full Linux reboot. No configuration is lost
- Reboot main application: Perform a restart of the intercom application. No configuration is lost
- Factory reset: Set all parameters to Factory Default values. The station will get static IP Address 169.254.1.100.
- Factory reset with DHCP: Set all parameters to Factory Default values. The station will get IP Address from DHCP server. If no DHCP server in the network, it will get a random 169.254.x.x IP address.
- Clear local ZAP profile: Not used in AlphaCom mode
- Delete ZAP data.lua: Not used in AlphaCom mode
Logging
From the web interface of the station it is possible to activate logging, which can be useful for debugging and troubleshooting purposes. See Logging - IP Stations for more information.
Change Password
The password for web access and for accessing the display setup menus can be changed, see Password (IP Stations).
Backup and Restore
From the web interface of the station it is possible to backup and restore the configuration data. See Backup and Restore for more information.
Manual Upgrade
The software of the station can be upgraded via the web interface. see Turbine_Software_Upgrade for details.
Advanced AlphaCom tab
Audio
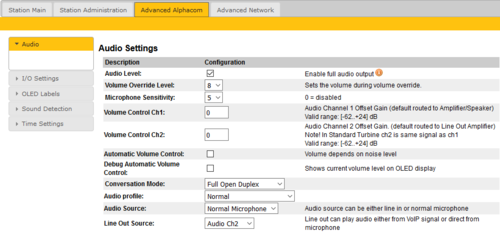
To configure audio settings select Advanced Alphacom > Audio from the menu
- Select or set values for the parameters:
- - Volume Override Level
- - Microphone Sensitivity
- - Automatic Volume Control
- - Debug Automatic Volume Control
- - Conversation Mode
- - Audio profile
- - Audio source
- - Line Out Source
Volume Override Level: Select the Volume Override Level in the range 0 to 8 from the drop-down box. The default setting is 8. This setting determines the volume to be used in the station when receving audio and the Volume Override feature is activated, see Volume Override for more details.
Microphone Sensitivity: Select the sensitivity level in the range 0 to 7 from the drop-down box. The default setting is 5. If used as a local PA panel, a setting in the 1 to 3 range will reduce the chance of acoustic feedback (howling)
Volume Control Ch1 & Ch2: Offset Gain (default routed to Amplifier/Speaker). Valid range: -62 to +24 dB
NOTE!This feature must be used with caution as incorrect settings may severely degrade the performance of the echo-cancelling algorithm.
Automatic Volume Control: Check the box to enable automatic volume control that is adjusted according to the noise level
Debug Automatic Volume Control: Check the box to show current volume level on OLED display
Conversation Mode: For this parameter, there are five options:
- Full Open Duplex: Normal mode with echo cancellation.
- Robust Duplex: Option used when open duplex fails due to excessive speaker loudness, microphone overload or very high nonlinear distortions.
- Half Duplex Switching: Switches speech direction depending on who speaks the loudest.
- Push-To-Talk: Half-duplex communication. Initially the microphone is shut off. Push the M-button to open the microphone, and release to listen. (Only applicable to stations with M-key)
- Open: Full Open Duplex without echo cancellation
Audio Profile: This parameter has the following options:
- Normal
- Noisy Environment
- Very Noisy Environment
- Advanced. Note!: Advanced options are for experienced users only! Incorrect settings may severely degrade the acoustic performance and intelligibility. Use with care!
- See Turbine Audio Profiles for more details
Audio Source: This parameter has the following options:
- Normal Microphone
- Line In (for Turbine Extended intercoms only)
Line Out Source: Let you choose if the Speaker signal (the VoIP stream from AlphaCom) also should be played on the Line Out output, or if the Microphone signal should be routed to the Line Out output.
When used with an external amplifier (and speakers), use Speaker. When using the built-in microphone as an input to another system, use Microphone.
I/O Settings
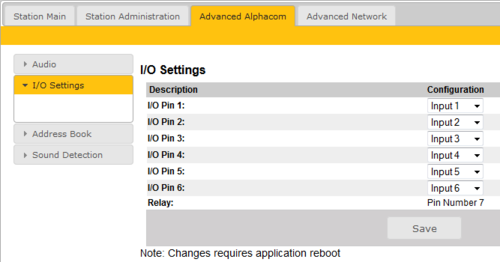
These settings let you choose if an I/O should be used as an Input or as an Output. By default all I/O's are set as Inputs.
- Select Advanced AlphaCom > I/O Settings from the menu
- Select either Input or Output options from the drop-down box for I/O Pins 1 to 6.
See also the article Turbine Inputs and Outputs in AlphaCom.
OLED Labels
See article OLED Labels on how to configure the display in the station models TCIS-4 and TCIS-5.
Address Book
See the article Address Book on how to configure the address book of the station models TCIS-6 and TCIV-6.
Keyboard Settings
Applies to the station models TFIE-x (Industrial station) and TFIX-x (Explosion proof station). See article TFIE Keyboard Settings for more details.
Sound Detection
The Sound Detection, also known as Voice Activity Detection (VAD) samples the audio level from the microphone located in the IP Station. If the audio level meets defined criterias an action in AlphaCom can be triggered.
Read more about Sound Detection.
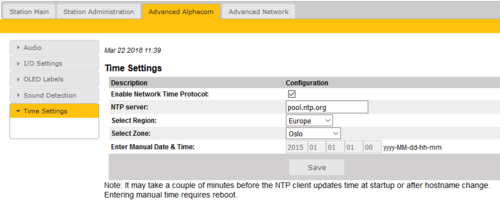
Time Settings
- Select Advanced AlphaCom > Time Settings from the menu
Time Settings: You can enable Network Time Protocol, select the time zone and set the hostname or the IP address of the NTP server.
Advanced Network tab
SNMP
A set of SNMP functions are available in the IP station. SNMP (Simple Network Management Protocol) is a protocol for centralizing the management of devices in IP networks.
See SNMP Settings for futher information.
802.1X
IEEE 802.1X is an IEEE Standard for port-based Network Access Control (PNAC). It provides an authentication mechanism to devices wishing to attach to a LAN, either establishing a point-to-point connection or preventing it if authentication fails. For details on configuration, see IEEE 802.1X.
Firewall
All IP Stations have an embedded firewall. See Firewall for details.
Log in to the Amplifier
Access the amplifier by logging into the web interface using a standard web browser:
- 1. Open a web browser on your PC
- 2. In the browser’s address bar, type the IP address of the amplifier. The login page will be displayed.
- 3. Enter Username and Password. Default username: admin. Default password: alphaadmin
The information page will now be displayed, showing the main configuration and status.
To find the IP address of the amplifier, use the Menu Selection Knob on the front of the amplifier, and navigate to Information > Network.
Main Settings
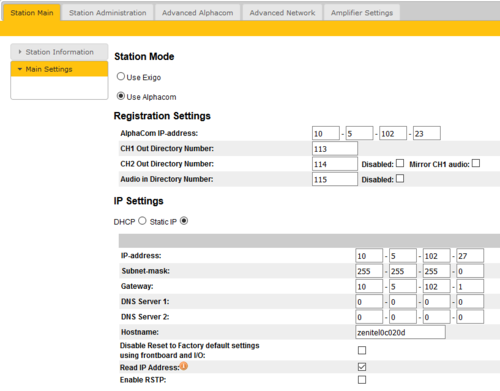
- Click Station Main > Main Settings to access the page for configuring station mode and IP parameters.
Station Mode: Select the Use Alphacom radio-button.
Registration Settings:
- AlphaCom IP-address: Enter the IP address of the AlphaCom server to which the amplifier is to be registered
The amplifier has up to three directory numbers you can configure: Channel 1, Channel 2 and Audio Input. Each of these require a license.
- CH1 Out Directory Number: Mandatory: Enter the directory number of the first loudspeaker output channel. The number must match the directory number defined in the AlphaCom server
- CH2 Out Directory Number: Optional: If the second loudspeaker channel should be addressed separately, the second channel must be registered to the AlphaCom using this directory number
- Audio In Directory Number: Optional: If the Line In is to be used from the amplifier, the input must be registered to the AlphaCom using this directory number
IP Settings:
- DHCP – Select this option if the IP station shall receive IP Settings from a DHCP server.
- Static IP – Select this option if the IP station shall use a static IP address. Enter values for:
- - IP-address
- - Subnet-mask
- - Gateway
- - DNS Server 1 (option for network administration)
- - DNS Server 2 (option for network administration)
- - Hostname (option for network administration)
- Disable Reset to Factory default settings using frontboard and I/O: If enabled, factory reset will only be possible from the web interface. This is disabled by default.
- Read IP Address: Not in use
- Enable RSTP: RSTP is only required when using redundant networking
Click Save followed by Apply to apply the new configuration settings.
Time Settings
- Select Advanced AlphaCom > Time Settings from the menu
Time Settings: You can enable Network Time Protocol, select the time zone and set the hostname or the IP address of the NTP server.
Logging
From the web interface of the amplifier it is possible to activate logging, which can be useful for debugging and troubleshooting purposes. See Logging - IP Stations for more information.
Configuration of the AlphaCom server
AlphaPro configuration
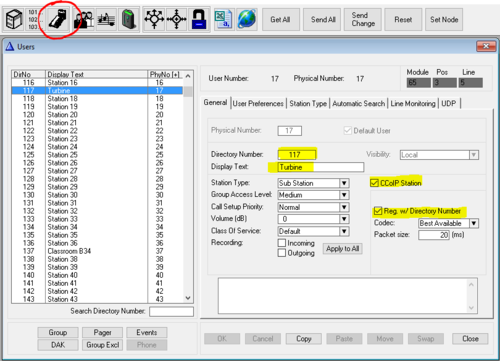
The amplifier is defined in Users & Stations window, General tab. For minimum configuration you need to enter these fields:
- Directory Number - must match the directory number configured in the amplifier itself
- Display Text - Any free text. Used as Caller ID.
- Station Type - Set to Substation
- CCoIP Station - Tick this checkbox
- Reg. w/Directory Number - Tick this checkbox
AlphaWeb configuration
Filter settings
Log on to the web interface of the AlphaCom server, and select System Configuration > Filters.
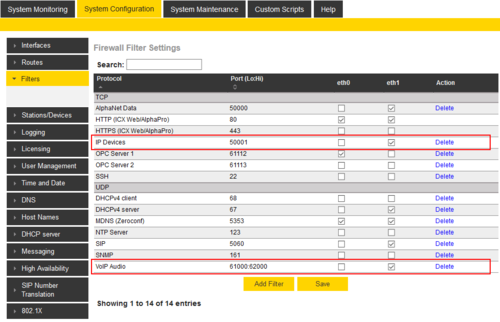
Enable "IP Stations" on TCP port 50001 and "VoIP Audio" on UDP ports 61000-61150 on the ethernet port used for the IP stations. By default these ports are enabled on ethernet port 1.
Licenses
The amplifier require licenses

