Difference between revisions of "ENA Configuration - AlphaCom mode"
From Zenitel Wiki
(Created page with "{{A}} thumb|400px|AlphaCom Intercom System This article describes the configuration required for a Turbine Station to opera...") |
(→License requirement) |
||
| (255 intermediate revisions by 4 users not shown) | |||
| Line 1: | Line 1: | ||
| − | {{ | + | {{AI}} [[File:ENA Amp block.png|thumb|800px|ICX-AlphaCom with ENA Amplifiers]] |
| − | [[File: | + | This article describes the configuration required for a Exigo Network Amplifier (ENA) to operate with an '''ICX-AlphaCom''' server. The ENA Amplifiers are configured through their web interface. The ICX-AlphaCom server is configured using the PC tool [[AlphaPro]]. |
| − | == | + | ==Software and License requirements == |
| − | + | === Minimum Software requirement === | |
| − | * | + | * '''ENA Amplifier''': 4.9.3.0 |
| − | |||
| − | |||
| − | === | + | AlphaCom XE series |
| − | + | * '''AlphaCom''': 12.5.3.0 | |
| − | : | + | * '''AlphaPro''': 11.7.3.2 |
| − | : | + | |
| − | + | ICX-AlphaCom | |
| − | [[File: | + | * '''ICX-AlphaCom''': 1.1.3.0 |
| + | * '''AlphaPro''': 12.1.3.0 | ||
| + | |||
| + | === License requirement === | ||
| + | * One [[Licenses#Exigo_.28ENA.29_Amplifier_license|ENA Amplifier Channel License]] is required per amplifier channel or audio in channel. | ||
| + | ** <span style="font-size:90%">For example, if Channel 1, Channel 2 and Audio In all have their own directory numbers, then 3 [[Licenses#Exigo_.28ENA.29_Amplifier_license|ENA Amplifier Channel License]] are required</span> | ||
| + | * To enable the use of Background Music at 48 kHz PCM, a [[Licenses#High_bandwidth_audio_license|High bandwidth audio license]] is required. It is sufficient with one HD Audio license per ICX-AlphaCom server. | ||
| + | |||
| + | To install the license, [[AlphaWeb#AlphaWeb_Login|log on to the web interface]] of the ICX-AlphaCom server, and select '''System Configuration''' > '''Licensing'''. | ||
| + | |||
| + | == Directory Numbers == | ||
| + | The ENA Amplifier supports 3 registrations on 3 separate directory numbers: | ||
| + | * First registration: CH1 audio output, RCO, RCI control and fault status monitoring | ||
| + | * Second registration: CH2 audio output | ||
| + | * Third registration: Mic In or Line in audio input | ||
| + | <br> | ||
| + | |||
| + | == The amplifier web interface== | ||
| + | === Station Main tab=== | ||
| + | ==== Station Information ==== | ||
| + | *[[Logging into an IP Station|Log In to the amplifier]] | ||
| + | *The '''Station Information''' page will now be displayed, showing the amplifier configuration and status. | ||
| + | [[File:ENA StationInfo.PNG|thumb|left|700px|The '''Station Information''' page]] | ||
<br style="clear:both;" /> | <br style="clear:both;" /> | ||
| − | |||
| − | |||
| − | |||
| − | |||
| − | |||
| − | ''''' | + | {{note|To find the IP address of the amplifier, use the [[ENA User Interface|Menu Selection Knob]] on the front of the amplifier, and navigate to '''Information''' > '''Network'''. }} |
| + | <br style="clear:both;" /> | ||
| − | ===Main Settings=== | + | ====Main Settings==== |
| − | * Click '''Station Main > Main Settings''' to access the page for configuring | + | * Click '''Station Main > Main Settings''' to access the page for configuring Station Mode and IP parameters. |
| − | [[File: | + | [[File:ENA MainSettings.PNG|thumb|left|700px]] |
<br style="clear:both;" /> | <br style="clear:both;" /> | ||
| − | '''Station Mode:''' Select the '''Use Alphacom''' radio-button. | + | '''Station Mode:''' Select the '''Use ICX-Alphacom''' radio-button. |
| − | ''' | + | '''Registration Settings:''' |
| + | * '''ICX-AlphaCom IP-address''': Enter the IP address of the ICX-AlphaCom server to which the amplifier is to be registered | ||
| − | ''' | + | The amplifier can be assigned up to three separate directory numbers: Loudspeaker Channel 1, Loudspeaker Channel 2 and Audio Input. The directory number(s) must also be defined in the ICX-AlphaCom server. |
| − | * ''' | + | * '''CH1 Out Directory Number''': The first registered channel. This channel only supports audio output to CH1 amplifier. |
| − | * '''Directory Number''': | + | * '''CH2 Out Directory Number''': The second registered channel. This channel will output audio to CH2 amplifier. |
| − | + | **'''Disabled''' option will disable this channel registration | |
| + | **'''Mirror CH1 audio''' will play CH1 audio stream on CH2, and CH2 will not require directory number and will not use any license | ||
| + | **When channel is mirrored, channel monitoring and volume controls (in web and GUI) are still separate | ||
| + | * '''Audio In Directory Number''': The third registered channel. This channel is used to send mic or line in audio to the ICX-AlphaCom | ||
| + | ** '''Disabled''' option will disable this channel registration | ||
'''IP Settings:''' | '''IP Settings:''' | ||
| Line 47: | Line 68: | ||
::- '''Hostname''' (option for network administration) | ::- '''Hostname''' (option for network administration) | ||
| − | *'''Read IP Address:''' | + | * '''Disable Reset to Factory default settings using frontboard and I/O''': If enabled, factory reset will only be possible from the web interface. This is disabled by default. |
| + | |||
| + | *'''Read IP Address:''' Not in use | ||
| + | |||
| + | *'''Enable RSTP''': RSTP is only required when using redundant networking | ||
| + | |||
| + | Click '''Save''' followed by '''Apply''' to apply the new configuration settings. | ||
| + | <br><br> | ||
| + | === Station Administration tab=== | ||
| + | ====Reboot ==== | ||
| + | [[File:ENA web Reboot.PNG|thumb|left|500px|Station Administration > Reboot menu]] | ||
| + | <br style="clear:both;" /> | ||
| + | * '''Reboot system''': Perform a full Linux reboot. No configuration is lost | ||
| + | * '''Reboot main application''': Perform a restart of the intercom application. No configuration is lost | ||
| + | * '''Factory reset''': Set all parameters to Factory Default values. The amplifier will get static IP Address 169.254.1.100. | ||
| + | * '''Factory reset with DHCP''': Set all parameters to Factory Default values. The amplifier will get IP Address from DHCP server. If no DHCP server in the network, it will get a random 169.254.x.x IP address. | ||
| + | * '''Clear local ZAP profile''': For special purpose | ||
| + | * '''Delete ZAP data.lua''': For special purpose | ||
| + | |||
| + | ==== Logging ==== | ||
| + | From the web interface of the amplifier it is possible to activate logging, which can be useful for debugging and troubleshooting purposes. See [[Logging - IP Stations|Logging - IP Stations]] for more information. | ||
| + | |||
| + | ==== Change Password ==== | ||
| + | * '''Web access''': The password for web access can be changed. | ||
| + | * '''GUI (display menu) access''': (Not available in the [[ENA2100-AC Amplifier|ENA2100-AC amplifier]]). By default the display menu of the amplifier can be accessed without any pin code. However, it is possible to enable that pin code is required. Two levels can be defined; Read and Full Access. | ||
| + | |||
| + | For more details, see [[Password (ENA Amplifiers)]]. | ||
| + | |||
| + | ==== Backup and Restore ==== | ||
| + | From the web interface of the amplifier it is possible to backup and restore the configuration data. See [[Backup and Restore (IP Stations)|Backup and Restore]] for more information. | ||
| + | |||
| + | ==== Manual Upgrade ==== | ||
| + | The software of the amplifier can be upgraded via the web interface. see [[Turbine_Software_Upgrade]] for details. | ||
| + | <br><br> | ||
| + | |||
| + | === Advanced ICX-AlphaCom tab=== | ||
| + | ====Audio ==== | ||
| + | In '''Advanced ICX-Alphacom > Audio''' ''Dynamic Range Compression'' can be enabled. | ||
| − | + | Typical music signals are characterized by crest factors, the ratio of peak signal power to average signal power, of 12dB or more. To avoid audible distortion due to clipping of peak signals, the gain of the DAC channel must be adjusted to prevent hard clipping of peak signals. As a result, during nominal periods, the applied gain is low, causing the perception that the signal is not loud enough. To overcome this problem, the DRC continuously monitors the output of the DAC Digital Volume control to detect its power level with regard to 0dBFS. When the power level is low, it increases the input signal gain to make it sound louder. At the same time, if a peaking signal is detected, it autonomously reduces the applied gain to avoid hard clipping. The resulting sound can be more pleasing to the ear as well as sounding louder during nominal periods. | |
| − | + | [[File:ENA DynRangeComp.PNG|thumb|left|500px]] | |
| + | <br style="clear:both;" /> | ||
| + | ==== DAVC Settings ==== | ||
| + | The Distributed Automatic Volume Control (DAVC) is an algorithm which is using one or more microphones to measure the ambient audio/noise level, and adjust the loudspeaker output level of the PA amplifier according to the ambient audio level. See [[Distributed Automatic Volume Control (DAVC)]] for more details. | ||
| − | + | ====Time Settings==== | |
| + | * Select '''Advanced ICX-AlphaCom > Time Settings''' from the menu | ||
| + | [[File:ENA TimeSettings.PNG|thumb|left|500px]] | ||
| + | <br style="clear:both;" /> | ||
| + | |||
| + | '''Time Settings:''' You can enable Network Time Protocol, select the time zone and set the hostname or the IP address of the NTP server. | ||
| + | <br><br> | ||
| + | |||
| + | === Advanced Network tab === | ||
| + | ==== SNMP ==== | ||
| + | A set of SNMP functions are available in the IP station. SNMP (Simple Network Management Protocol) is a protocol for centralizing the management of devices in IP networks. | ||
| + | |||
| + | See [[SNMP in IP Stations]] for futher information. | ||
| + | |||
| + | ==== 802.1X ==== | ||
| + | IEEE 802.1X is an IEEE Standard for port-based Network Access Control (PNAC). It provides an authentication mechanism to devices wishing to attach to a LAN, either establishing a point-to-point connection or preventing it if authentication fails. For details on configuration, see [[IEEE 802.1X]]. | ||
| − | === | + | ==== Firewall ==== |
| − | + | All IP Stations have an embedded firewall. See [[Firewall (IP Stations)|Firewall]] for details. | |
| − | [[File: | + | <br><br> |
| + | === Amplifier Settings tab === | ||
| + | ==== Status ==== | ||
| + | [[File:ENA Status.PNG|thumb|left|500px|The '''Status''' page]] | ||
<br style="clear:both;" /> | <br style="clear:both;" /> | ||
| − | * | + | *'''Faults''' |
| − | + | ** Display currently active faults on amplifier | |
| − | + | ** The page is automatically refreshed each 10 seconds (can be manually refreshed) | |
| − | + | ** Only faults that are active for enabled monitoring options are visible | |
| − | + | ** If the page is empty there are no reported faults | |
| − | : | + | *'''Temperature measurements''' |
| − | : | + | ** Display different temperature levels |
| − | + | * '''Voltage measurements''' | |
| − | + | ** Display measured voltage levels for diagnostics | |
| + | |||
| + | ==== Line Control ==== | ||
| + | <gallery caption= "The Line Control page" widths="550px" heights="720px" perrow="2"> | ||
| + | File:LineControl ENA2200.png|Line Control page - ENA2200 and ENA2400 amplifiers | ||
| + | File:LineControl ENA2100.png|Line Control page - ENA2100 amplifier | ||
| + | </gallery> | ||
| − | ''' | + | <br><br> |
| + | '''Amplifier lines configuration''' ['''''ENA2100-AC only'''''] | ||
| + | * '''Lines Enabled''': Enable/Disable Amplifier outgoing loudspeaker lines | ||
| + | * '''Line Voltage''': Shows the currently configured line voltage | ||
| + | * '''SLM Software version''': Shows the software version of SLM (Speaker Line Monitoring) processor | ||
| + | * '''One Channel mode''': [[ENA2100 - One Channel Mode|One channel mode]] for this amplifier | ||
| − | |||
| − | ''' | + | '''Voltage''' options: |
| − | + | * '''Line Voltage''' choose speaker line voltage from 70V or 100V options | |
| + | * Voltage is saved independently | ||
| − | ''' | + | '''Channel 1'''/'''Channel 2''' options: |
| + | * '''Channel Enabled''' ['''''Not available in ENA2100-AC'''''] will disable/enable selected channel, this shutdowns/starts channel amplifier and is not related to disabling channel registration (Station Main → Main Settings → Registration Settings → CH2/Audio in → '''Disabled''') | ||
| + | * '''Master Volume''' in dB changes channel volume for digital audio | ||
| + | * '''Analog Route Line In to ch''': The amplifier is able to play audio directly from it's Line Input without it being registered to an ICX-AlphaCom server. Using these options one can route audio from the Line IN input directly to the loudspeaker output. | ||
| + | ** '''Always Off''': Routing is always disabled | ||
| + | ** '''No IP Audio/Reg''' Route audio if no sound is being played from IP network, or there is no server connection or the amplifier is not registered to a server. | ||
| + | ** '''Not Registered''': Route audio if there is no server connection or the amplifier is not registered to a server. | ||
| + | ** '''Always On''': Routing is always enabled | ||
| + | ** See more details at [[ENA amplifier in Bypass Mode]] | ||
| + | * '''Analog Routing Gain''' ['''''Not available in ENA2100-AC''''']: This setting is only available when '''Analog Route Line In to ch''' is enabled). Adjust the gain when analog routing is selected, '''Master Volume''' values are not used. Setting goes from -6 to 0dB. | ||
| + | * Monitor Mode can be '''Disabled''', '''Manual''' for manual monitor triggering and '''Continuous''' for continuous monitoring | ||
| + | ** To get access to monitoring configuration options, either type of monitoring has to be enabled | ||
| − | ''' | + | '''Line In''' options: |
| + | * '''Line In Type''' selects which input is used for audio input: '''Line Input''' or '''Microphone'''. (The [[ENA2100-AC Amplifier|ENA2100-AC]] does not support "Microphone" input). | ||
| + | * '''Impedance''' changes line in impedance. Options are "600 Ohms" or "High". (The [[ENA2100-AC Amplifier|ENA2100-AC]] is fixed to 600 Ohms). | ||
| + | * '''Gain''' changes line in gain (0 - 47 dB) | ||
| + | * '''Phantom Microphone''' (only available when Line In Type is '''Microphone Input''') enables phantom power for microphone | ||
| − | + | <br> | |
| − | |||
| − | |||
| − | |||
| − | |||
| − | |||
| − | |||
| − | + | ===== Monitoring options ===== | |
| − | + | Available monitoring options when '''Monitoring''' is set to '''Continuous''' or '''Manual''': | |
| − | |||
| − | |||
| − | |||
| − | |||
| − | |||
| − | ''' | + | '''Channel 1'''/'''Channel 2''': |
| − | + | * '''LET Monitoring''' enables [[ELTSI-1|Line End Transponder]] monitoring | |
| − | + | * '''Line Monitoring''' enables Speaker Line Monitoring (SLM) | |
| − | + | * '''Line Monitoring Options''' (only available when '''Line Monitoring''' is enabled) | |
| + | ** '''Detailed Line Fault Reporting''' will enable separate reporting of open and shorted, not available on all speaker line configurations | ||
| + | ** '''Load Change''' monitor line load change | ||
| + | ** '''Ground Fault''' monitor line ground fault | ||
| + | * '''Manual Monitoring Options''' (only available when '''Monitor Mode''' is '''Manual''') | ||
| + | ** '''Remove LET Faults''' when enabled LET faults will be removed when manual monitoring is finished | ||
| + | ** '''Remove SLM Faults''' when enabled SLM faults will be removed when manual monitoring is finished | ||
| + | * '''Fault Report Options''' | ||
| + | ** '''Report Faults Severity''' selects how are line faults reported on device GUI as critical (red exclamation sign) or warnings (yellow exclamation sign) | ||
| + | * '''Suspend Monitoring Options''' (only available when '''Monitor Mode''' is '''Continuous''') | ||
| + | ** When Suspended Monitoring is enabled, the amplifier will suspend the monitoring signal when there is a call on the channel to avoid false alerts and maintain audio quality. | ||
| + | * '''LET''' (only available when '''LET Monitoring''' is enabled) | ||
| + | ** '''10 LETs''' per channel can be added | ||
| + | ** '''Failed Counter''' How many times LET should fail before error is reported | ||
| + | * '''Calibration Info''' (only available when channel monitoring is enabled, configured and saved) | ||
| + | ** '''Calibrate''' command ('''35 seconds''' timeout) will attempt channel calibration | ||
| + | ** '''Reset Calibration''' ('''3 seconds''' timeout) will reset channel calibration | ||
| + | ** '''Measure''' ('''60 second''' timeout, only available if '''Monitor Mode''' is '''Manual''' and channel is successfully calibrated) will manual monitor channel for 60 seconds and report any faults detected | ||
| − | '''Line | + | '''Line In''': ['''''Not available in ENA2100-AC'''''] |
| − | + | * '''Pilot Tone Sensing''' (only available when Advanced ICX-Alphacom → Lines → ln1 → Line In Type is Line Input) | |
| + | * '''Phantom Microphone Monitoring''' (only available when Advanced ICX-Alphacom → Lines → ln1 → Line In Type is '''Microphone Input''' and '''Phantom Microphone''' is enabled) | ||
| + | ** When enabled, a fault is reported when a phantom powered microphone is disconnected. Default values are tested to work well detecting an ECM3000 phantom powered microphone. | ||
| + | * '''Current Connected Minimum''' (only available when '''Phantom Microphone Monitorin'''g is enabled). Sets the minimum amount of current in microamperes passing through the microphone connection before the alert is triggered. | ||
| + | * '''Voltage Connected Minimum''' (only available when '''Phantom Microphone Monitoring''' is enabled). | ||
| − | + | <br> | |
| − | === | + | ==== RCO/RCI Config ==== |
| − | + | There are 6 Control Outputs (RCO) and 6 Control Inputs (RCI) available. (On the [[ENA2100-AC Amplifier|ENA2100-AC amplifier]] there are 2 RCOs and 2 RCIs). | |
| − | + | ||
| − | [[File: | + | [[File:ENA RCI RCO.png|thumb|left|500px|The '''RCO/RCI Config''' page]] |
<br style="clear:both;" /> | <br style="clear:both;" /> | ||
| + | <br><br> | ||
| − | + | '''Configuration''' of the outputs and inputs is done from [[AlphaPro]]: | |
| + | * The '''Control Output''' must be mapped to a [[RCO - Remote Control Output|Logical RCO]]. The operation of the logical RCOs is configured in the [[Event Handler]] window. | ||
| + | * The '''Control Input''' is configured in the [[RCI_-_Remote_Contol_Input#Inputs_from_AlphaCom.2C_ENA_Amplifier.2C_IPARIO_and_RIO|RCI table in AlphaPro]] | ||
| − | |||
| − | === | + | ===== Monitoring options ===== |
| − | + | The ENA amplifier offers monitoring of the outputs and the inputs: | |
| + | * RCOs | ||
| + | **RCO Monitoring alerts when the signal on the contacts are outside the configured legal values. | ||
| + | **'''Limit Low OK''' - If the RCO triggers and the voltage is below this value, it is reported as "Shorted". | ||
| + | **'''Limit High Not OK''' - If the RCO is not above this voltage when output is high, it is reported as an "Overload". | ||
| + | |||
| + | * RCIs | ||
| + | ** RCI Config allows configuring the thresholds for when the RCI triggers. An RCI has an open voltage of 10V across the terminals. [[ENA_Amplifier_-_Mounting_and_Installation#Control_Inputs|A resistor network]] is needed to ensure that RCI's can be monitored properly. | ||
| + | ** '''Not Connected''' - When the voltage on the pin is higher than this threshold, it's set as Not Connected. | ||
| + | ** '''Not Pressed''' - Low threshold for the RCI to be considered not pressed. | ||
| + | ** '''Pressed''' - High threshold for the RCI to be considered pressed. | ||
| + | ** '''Monitor RCI''' enables monitoring of RCI. | ||
| − | + | <br> | |
| − | |||
| − | === | + | ==== Advanced Config ==== |
| − | + | Enable and configure various monitoring features. | |
| − | = | + | [[File:ENA AdvConfig.PNG|thumb|left|500px|The '''Advanced Config''' page]] |
| − | + | <br style="clear:both;" /> | |
| + | <br><br> | ||
| − | + | * '''Internal Power Monitoring''' | |
| + | ** '''Monitor AC Power''' enable AC power monitoring | ||
| + | ** '''Monitor DC Power''' enable DC power monitoring | ||
| − | + | * '''Internal Monitoring Parameters''' | |
| − | * | + | **'''Voltage Warning Deviation''' Issue a warning if internal voltage changes more than configured percentage from reference voltage |
| − | [[ | + | **'''Voltage Alert Deviation''' Issue a alert if internal voltage changes more than configured percentage from reference voltage |
| − | + | **'''Voltage Deviation Report''' Report in GUI status bar if internal voltage changes more than configured percentage from reference voltage | |
| + | **'''Current Deviation Report''' Report in GUI status bar if internal current changes more than configured percentage from reference voltage | ||
| + | |||
| + | * '''Headphone''' (Not available in the [[ENA2100-AC Amplifier|ENA2100-AC amplifier]]) | ||
| + | ** '''Monitor Headphone''' reports if headphone is disconnected | ||
| − | ''' | + | * '''Fan Amplifier''' |
| + | ** '''Alarm High On''' starts alarm on sequence if ambient temp is above high limit for this amount of time | ||
| + | ** '''Alarm High Off''' starts alarm off sequence if ambient temp is below high limit for this amount of time | ||
| + | ** '''Max PWM Off''' starts fan normal PWM sequence if ambient temp is below high temp limit for this amount of time | ||
| + | ** '''Wait Fan OFF''' number of seconds fan is running after lower temp level for fan running reached | ||
| + | ** '''Fan Spin Up''' number of ms fan is running at full speed after spinning up | ||
| + | ** '''Verify Fan Operation''' number of seconds fan is running with fixed speed (60% max) when verify fan procedure is activated | ||
| + | ** '''Wait Verify Fan Operation''' time to wait after fan stops running before Verify Fan Operation procedure is activated | ||
| + | ** '''RPM Deviation''' fan RPM deviation used for fan speed checking | ||
| + | ** '''RPM Status Deviation''' fan RPM deviation used for GUI reporting | ||
| + | ** '''PWM Spin UP''' start Fan with Spin-Up factor in percentage of PWM max | ||
| + | ** '''Deviation report''' minimum percent before temp change reported | ||
| − | + | * '''Ethernet Switch''' | |
| − | + | ** '''Monitor Eth 1''' monitor Ethernet switch port 1 cable connection | |
| + | ** '''Monitor Eth 2''' monitor Ethernet switch port 2 cable connection | ||
| − | == Configuration of the AlphaCom server== | + | == Configuration of the ICX-AlphaCom server== |
=== AlphaPro configuration === | === AlphaPro configuration === | ||
| − | ==== | + | |
| − | + | ====Configure amplifier directory number for Channel 1==== | |
| − | :*'''Directory Number''' - must match the | + | Go to '''Users & Stations''' > '''General''' tab. |
| − | :*'''Display Text''' - Any | + | :*'''Directory Number''' - must match the "[[#Main_Settings|Ch1 Out Directory Number]]" configured in the amplifier |
| − | :*'''Station Type''' - Set to '''Substation | + | :*'''Display Text''' - Any text |
| − | :*'''CCoIP Station''' - Tick this checkbox | + | :*'''Station Type''' - Set to '''Substation''' |
| − | + | :*'''CCoIP Station''' - Tick this checkbox | |
| − | [[File: | + | [[File:ENA UserAlphaPro.PNG|left|500px|thumb|Configure ENA Amplifier - Channel 1]] |
<br style="clear:both;" /> | <br style="clear:both;" /> | ||
| − | |||
| − | ==== Configure | + | ====Configure amplifier directory number for Channel 2==== |
| − | + | If the two loudspeaker channels should be addressed separately, you need to enter a directory number also for the second channel: | |
| − | |||
| − | |||
| − | [[File: | + | Go to '''Users & Stations''' > '''General''' tab. |
| + | :*'''Directory Number''' - must match the "[[#Main_Settings|Ch2 Out Directory Number]]" configured in the amplifier | ||
| + | :*'''Display Text''' - Any text | ||
| + | :*'''Station Type''' - Set to '''Substation''' | ||
| + | :*'''CCoIP Station''' - Tick this checkbox | ||
| + | [[File:ENA User2AlphaPro.PNG|left|500px|thumb|Configure ENA Amplifier - Channel 2]] | ||
<br style="clear:both;" /> | <br style="clear:both;" /> | ||
| + | <br><br> | ||
=== AlphaWeb configuration === | === AlphaWeb configuration === | ||
==== Filter settings ==== | ==== Filter settings ==== | ||
| − | [[AlphaWeb#AlphaWeb_Login|Log on to the web interface]] of the AlphaCom server, and select '''System Configuration''' > '''Filters'''. | + | The '''TCP port 50001''' ("IP Stations") and '''UDP ports 61000-61150''' ("VoIP Audio") must be enabled on the ethernet port used by the amplifier. By default these ports are enabled on ethernet port 1. |
| + | |||
| + | [[AlphaWeb#AlphaWeb_Login|Log on to the web interface]] of the ICX-AlphaCom server, and select '''System Configuration''' > '''Filters'''. | ||
| − | |||
| − | [[File:Filters IPStation.png|left|500px|thumb|Enable ports for IP Stations]] | + | [[File:Filters IPStation.png|left|500px|thumb|Enable ports for IP Stations (and amplifiers)]] |
<br style="clear:both;" /> | <br style="clear:both;" /> | ||
| − | ==== | + | ==== Licenses ==== |
| + | One '''ENA Amplifier Channel License''' is required per amplifier channel. | ||
| + | *1009641701: License for 1 Exigo amplifier channel | ||
| + | *1009641702: License for 2 Exigo amplifier channels | ||
| + | *1009641703: License for 3 Exigo amplifier channels | ||
| + | *1009641706: License for 6 Exigo amplifier channels | ||
| + | *1009641712: License for 12 Exigo amplifier channels | ||
| + | |||
| + | When using '''HD audio''' for background music distribution, a "High bandwidth audio license" is reqired. It is sufficient with one HD Audio license per ICX-AlphaCom server. | ||
| + | * 1009648510: High bandwidth audio license | ||
| − | + | To install the license, [[AlphaWeb#AlphaWeb_Login|log on to the web interface]] of the ICX-AlphaCom server, and select '''System Configuration''' > '''Licensing'''. | |
| − | [[Category: | + | [[Category: Public Address - Features and configuration]] |
Latest revision as of 15:36, 14 January 2022


This article describes the configuration required for a Exigo Network Amplifier (ENA) to operate with an ICX-AlphaCom server. The ENA Amplifiers are configured through their web interface. The ICX-AlphaCom server is configured using the PC tool AlphaPro.
Contents
Software and License requirements
Minimum Software requirement
- ENA Amplifier: 4.9.3.0
AlphaCom XE series
- AlphaCom: 12.5.3.0
- AlphaPro: 11.7.3.2
ICX-AlphaCom
- ICX-AlphaCom: 1.1.3.0
- AlphaPro: 12.1.3.0
License requirement
- One ENA Amplifier Channel License is required per amplifier channel or audio in channel.
- For example, if Channel 1, Channel 2 and Audio In all have their own directory numbers, then 3 ENA Amplifier Channel License are required
- To enable the use of Background Music at 48 kHz PCM, a High bandwidth audio license is required. It is sufficient with one HD Audio license per ICX-AlphaCom server.
To install the license, log on to the web interface of the ICX-AlphaCom server, and select System Configuration > Licensing.
Directory Numbers
The ENA Amplifier supports 3 registrations on 3 separate directory numbers:
- First registration: CH1 audio output, RCO, RCI control and fault status monitoring
- Second registration: CH2 audio output
- Third registration: Mic In or Line in audio input
The amplifier web interface
Station Main tab
Station Information
- Log In to the amplifier
- The Station Information page will now be displayed, showing the amplifier configuration and status.


|
To find the IP address of the amplifier, use the Menu Selection Knob on the front of the amplifier, and navigate to Information > Network. |
Main Settings
- Click Station Main > Main Settings to access the page for configuring Station Mode and IP parameters.

Station Mode: Select the Use ICX-Alphacom radio-button.
Registration Settings:
- ICX-AlphaCom IP-address: Enter the IP address of the ICX-AlphaCom server to which the amplifier is to be registered
The amplifier can be assigned up to three separate directory numbers: Loudspeaker Channel 1, Loudspeaker Channel 2 and Audio Input. The directory number(s) must also be defined in the ICX-AlphaCom server.
- CH1 Out Directory Number: The first registered channel. This channel only supports audio output to CH1 amplifier.
- CH2 Out Directory Number: The second registered channel. This channel will output audio to CH2 amplifier.
- Disabled option will disable this channel registration
- Mirror CH1 audio will play CH1 audio stream on CH2, and CH2 will not require directory number and will not use any license
- When channel is mirrored, channel monitoring and volume controls (in web and GUI) are still separate
- Audio In Directory Number: The third registered channel. This channel is used to send mic or line in audio to the ICX-AlphaCom
- Disabled option will disable this channel registration
IP Settings:
- DHCP – Select this option if the IP station shall receive IP Settings from a DHCP server.
- Static IP – Select this option if the IP station shall use a static IP address. Enter values for:
- - IP-address
- - Subnet-mask
- - Gateway
- - DNS Server 1 (option for network administration)
- - DNS Server 2 (option for network administration)
- - Hostname (option for network administration)
- Disable Reset to Factory default settings using frontboard and I/O: If enabled, factory reset will only be possible from the web interface. This is disabled by default.
- Read IP Address: Not in use
- Enable RSTP: RSTP is only required when using redundant networking
Click Save followed by Apply to apply the new configuration settings.
Station Administration tab
Reboot

- Reboot system: Perform a full Linux reboot. No configuration is lost
- Reboot main application: Perform a restart of the intercom application. No configuration is lost
- Factory reset: Set all parameters to Factory Default values. The amplifier will get static IP Address 169.254.1.100.
- Factory reset with DHCP: Set all parameters to Factory Default values. The amplifier will get IP Address from DHCP server. If no DHCP server in the network, it will get a random 169.254.x.x IP address.
- Clear local ZAP profile: For special purpose
- Delete ZAP data.lua: For special purpose
Logging
From the web interface of the amplifier it is possible to activate logging, which can be useful for debugging and troubleshooting purposes. See Logging - IP Stations for more information.
Change Password
- Web access: The password for web access can be changed.
- GUI (display menu) access: (Not available in the ENA2100-AC amplifier). By default the display menu of the amplifier can be accessed without any pin code. However, it is possible to enable that pin code is required. Two levels can be defined; Read and Full Access.
For more details, see Password (ENA Amplifiers).
Backup and Restore
From the web interface of the amplifier it is possible to backup and restore the configuration data. See Backup and Restore for more information.
Manual Upgrade
The software of the amplifier can be upgraded via the web interface. see Turbine_Software_Upgrade for details.
Advanced ICX-AlphaCom tab
Audio
In Advanced ICX-Alphacom > Audio Dynamic Range Compression can be enabled.
Typical music signals are characterized by crest factors, the ratio of peak signal power to average signal power, of 12dB or more. To avoid audible distortion due to clipping of peak signals, the gain of the DAC channel must be adjusted to prevent hard clipping of peak signals. As a result, during nominal periods, the applied gain is low, causing the perception that the signal is not loud enough. To overcome this problem, the DRC continuously monitors the output of the DAC Digital Volume control to detect its power level with regard to 0dBFS. When the power level is low, it increases the input signal gain to make it sound louder. At the same time, if a peaking signal is detected, it autonomously reduces the applied gain to avoid hard clipping. The resulting sound can be more pleasing to the ear as well as sounding louder during nominal periods.

DAVC Settings
The Distributed Automatic Volume Control (DAVC) is an algorithm which is using one or more microphones to measure the ambient audio/noise level, and adjust the loudspeaker output level of the PA amplifier according to the ambient audio level. See Distributed Automatic Volume Control (DAVC) for more details.
Time Settings
- Select Advanced ICX-AlphaCom > Time Settings from the menu

Time Settings: You can enable Network Time Protocol, select the time zone and set the hostname or the IP address of the NTP server.
Advanced Network tab
SNMP
A set of SNMP functions are available in the IP station. SNMP (Simple Network Management Protocol) is a protocol for centralizing the management of devices in IP networks.
See SNMP in IP Stations for futher information.
802.1X
IEEE 802.1X is an IEEE Standard for port-based Network Access Control (PNAC). It provides an authentication mechanism to devices wishing to attach to a LAN, either establishing a point-to-point connection or preventing it if authentication fails. For details on configuration, see IEEE 802.1X.
Firewall
All IP Stations have an embedded firewall. See Firewall for details.
Amplifier Settings tab
Status

- Faults
- Display currently active faults on amplifier
- The page is automatically refreshed each 10 seconds (can be manually refreshed)
- Only faults that are active for enabled monitoring options are visible
- If the page is empty there are no reported faults
- Temperature measurements
- Display different temperature levels
- Voltage measurements
- Display measured voltage levels for diagnostics
Line Control
- The Line Control page
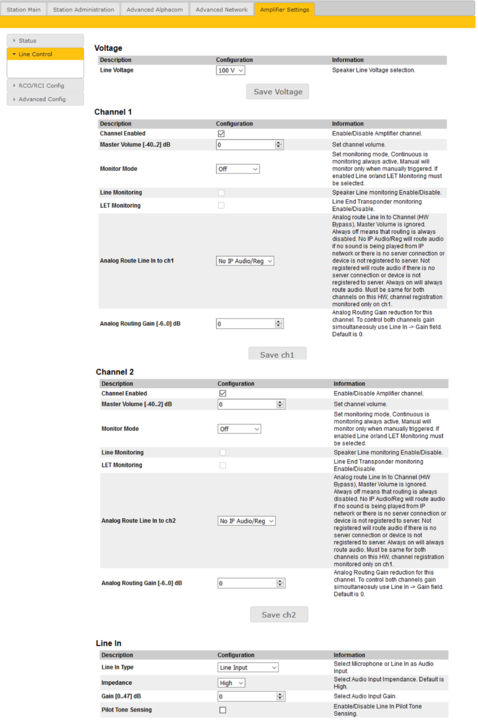
Line Control page - ENA2200 and ENA2400 amplifiers
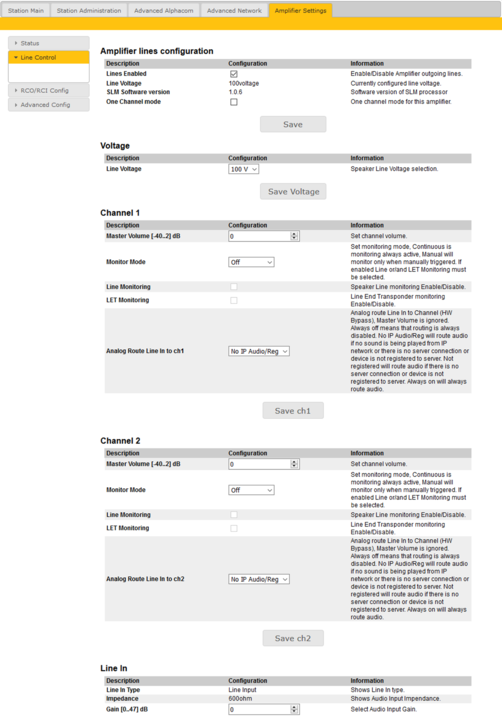
Line Control page - ENA2100 amplifier


Amplifier lines configuration [ENA2100-AC only]
- Lines Enabled: Enable/Disable Amplifier outgoing loudspeaker lines
- Line Voltage: Shows the currently configured line voltage
- SLM Software version: Shows the software version of SLM (Speaker Line Monitoring) processor
- One Channel mode: One channel mode for this amplifier
Voltage options:
- Line Voltage choose speaker line voltage from 70V or 100V options
- Voltage is saved independently
Channel 1/Channel 2 options:
- Channel Enabled [Not available in ENA2100-AC] will disable/enable selected channel, this shutdowns/starts channel amplifier and is not related to disabling channel registration (Station Main → Main Settings → Registration Settings → CH2/Audio in → Disabled)
- Master Volume in dB changes channel volume for digital audio
- Analog Route Line In to ch: The amplifier is able to play audio directly from it's Line Input without it being registered to an ICX-AlphaCom server. Using these options one can route audio from the Line IN input directly to the loudspeaker output.
- Always Off: Routing is always disabled
- No IP Audio/Reg Route audio if no sound is being played from IP network, or there is no server connection or the amplifier is not registered to a server.
- Not Registered: Route audio if there is no server connection or the amplifier is not registered to a server.
- Always On: Routing is always enabled
- See more details at ENA amplifier in Bypass Mode
- Analog Routing Gain [Not available in ENA2100-AC]: This setting is only available when Analog Route Line In to ch is enabled). Adjust the gain when analog routing is selected, Master Volume values are not used. Setting goes from -6 to 0dB.
- Monitor Mode can be Disabled, Manual for manual monitor triggering and Continuous for continuous monitoring
- To get access to monitoring configuration options, either type of monitoring has to be enabled
Line In options:
- Line In Type selects which input is used for audio input: Line Input or Microphone. (The ENA2100-AC does not support "Microphone" input).
- Impedance changes line in impedance. Options are "600 Ohms" or "High". (The ENA2100-AC is fixed to 600 Ohms).
- Gain changes line in gain (0 - 47 dB)
- Phantom Microphone (only available when Line In Type is Microphone Input) enables phantom power for microphone
Monitoring options
Available monitoring options when Monitoring is set to Continuous or Manual:
Channel 1/Channel 2:
- LET Monitoring enables Line End Transponder monitoring
- Line Monitoring enables Speaker Line Monitoring (SLM)
- Line Monitoring Options (only available when Line Monitoring is enabled)
- Detailed Line Fault Reporting will enable separate reporting of open and shorted, not available on all speaker line configurations
- Load Change monitor line load change
- Ground Fault monitor line ground fault
- Manual Monitoring Options (only available when Monitor Mode is Manual)
- Remove LET Faults when enabled LET faults will be removed when manual monitoring is finished
- Remove SLM Faults when enabled SLM faults will be removed when manual monitoring is finished
- Fault Report Options
- Report Faults Severity selects how are line faults reported on device GUI as critical (red exclamation sign) or warnings (yellow exclamation sign)
- Suspend Monitoring Options (only available when Monitor Mode is Continuous)
- When Suspended Monitoring is enabled, the amplifier will suspend the monitoring signal when there is a call on the channel to avoid false alerts and maintain audio quality.
- LET (only available when LET Monitoring is enabled)
- 10 LETs per channel can be added
- Failed Counter How many times LET should fail before error is reported
- Calibration Info (only available when channel monitoring is enabled, configured and saved)
- Calibrate command (35 seconds timeout) will attempt channel calibration
- Reset Calibration (3 seconds timeout) will reset channel calibration
- Measure (60 second timeout, only available if Monitor Mode is Manual and channel is successfully calibrated) will manual monitor channel for 60 seconds and report any faults detected
Line In: [Not available in ENA2100-AC]
- Pilot Tone Sensing (only available when Advanced ICX-Alphacom → Lines → ln1 → Line In Type is Line Input)
- Phantom Microphone Monitoring (only available when Advanced ICX-Alphacom → Lines → ln1 → Line In Type is Microphone Input and Phantom Microphone is enabled)
- When enabled, a fault is reported when a phantom powered microphone is disconnected. Default values are tested to work well detecting an ECM3000 phantom powered microphone.
- Current Connected Minimum (only available when Phantom Microphone Monitoring is enabled). Sets the minimum amount of current in microamperes passing through the microphone connection before the alert is triggered.
- Voltage Connected Minimum (only available when Phantom Microphone Monitoring is enabled).
RCO/RCI Config
There are 6 Control Outputs (RCO) and 6 Control Inputs (RCI) available. (On the ENA2100-AC amplifier there are 2 RCOs and 2 RCIs).

Configuration of the outputs and inputs is done from AlphaPro:
- The Control Output must be mapped to a Logical RCO. The operation of the logical RCOs is configured in the Event Handler window.
- The Control Input is configured in the RCI table in AlphaPro
Monitoring options
The ENA amplifier offers monitoring of the outputs and the inputs:
- RCOs
- RCO Monitoring alerts when the signal on the contacts are outside the configured legal values.
- Limit Low OK - If the RCO triggers and the voltage is below this value, it is reported as "Shorted".
- Limit High Not OK - If the RCO is not above this voltage when output is high, it is reported as an "Overload".
- RCIs
- RCI Config allows configuring the thresholds for when the RCI triggers. An RCI has an open voltage of 10V across the terminals. A resistor network is needed to ensure that RCI's can be monitored properly.
- Not Connected - When the voltage on the pin is higher than this threshold, it's set as Not Connected.
- Not Pressed - Low threshold for the RCI to be considered not pressed.
- Pressed - High threshold for the RCI to be considered pressed.
- Monitor RCI enables monitoring of RCI.
Advanced Config
Enable and configure various monitoring features.

- Internal Power Monitoring
- Monitor AC Power enable AC power monitoring
- Monitor DC Power enable DC power monitoring
- Internal Monitoring Parameters
- Voltage Warning Deviation Issue a warning if internal voltage changes more than configured percentage from reference voltage
- Voltage Alert Deviation Issue a alert if internal voltage changes more than configured percentage from reference voltage
- Voltage Deviation Report Report in GUI status bar if internal voltage changes more than configured percentage from reference voltage
- Current Deviation Report Report in GUI status bar if internal current changes more than configured percentage from reference voltage
- Headphone (Not available in the ENA2100-AC amplifier)
- Monitor Headphone reports if headphone is disconnected
- Fan Amplifier
- Alarm High On starts alarm on sequence if ambient temp is above high limit for this amount of time
- Alarm High Off starts alarm off sequence if ambient temp is below high limit for this amount of time
- Max PWM Off starts fan normal PWM sequence if ambient temp is below high temp limit for this amount of time
- Wait Fan OFF number of seconds fan is running after lower temp level for fan running reached
- Fan Spin Up number of ms fan is running at full speed after spinning up
- Verify Fan Operation number of seconds fan is running with fixed speed (60% max) when verify fan procedure is activated
- Wait Verify Fan Operation time to wait after fan stops running before Verify Fan Operation procedure is activated
- RPM Deviation fan RPM deviation used for fan speed checking
- RPM Status Deviation fan RPM deviation used for GUI reporting
- PWM Spin UP start Fan with Spin-Up factor in percentage of PWM max
- Deviation report minimum percent before temp change reported
- Ethernet Switch
- Monitor Eth 1 monitor Ethernet switch port 1 cable connection
- Monitor Eth 2 monitor Ethernet switch port 2 cable connection
Configuration of the ICX-AlphaCom server
AlphaPro configuration
Configure amplifier directory number for Channel 1
Go to Users & Stations > General tab.
- Directory Number - must match the "Ch1 Out Directory Number" configured in the amplifier
- Display Text - Any text
- Station Type - Set to Substation
- CCoIP Station - Tick this checkbox

Configure amplifier directory number for Channel 2
If the two loudspeaker channels should be addressed separately, you need to enter a directory number also for the second channel:
Go to Users & Stations > General tab.
- Directory Number - must match the "Ch2 Out Directory Number" configured in the amplifier
- Display Text - Any text
- Station Type - Set to Substation
- CCoIP Station - Tick this checkbox

AlphaWeb configuration
Filter settings
The TCP port 50001 ("IP Stations") and UDP ports 61000-61150 ("VoIP Audio") must be enabled on the ethernet port used by the amplifier. By default these ports are enabled on ethernet port 1.
Log on to the web interface of the ICX-AlphaCom server, and select System Configuration > Filters.

Licenses
One ENA Amplifier Channel License is required per amplifier channel.
- 1009641701: License for 1 Exigo amplifier channel
- 1009641702: License for 2 Exigo amplifier channels
- 1009641703: License for 3 Exigo amplifier channels
- 1009641706: License for 6 Exigo amplifier channels
- 1009641712: License for 12 Exigo amplifier channels
When using HD audio for background music distribution, a "High bandwidth audio license" is reqired. It is sufficient with one HD Audio license per ICX-AlphaCom server.
- 1009648510: High bandwidth audio license
To install the license, log on to the web interface of the ICX-AlphaCom server, and select System Configuration > Licensing.