Getting Started (ICX-AlphaCom)
From Zenitel Wiki

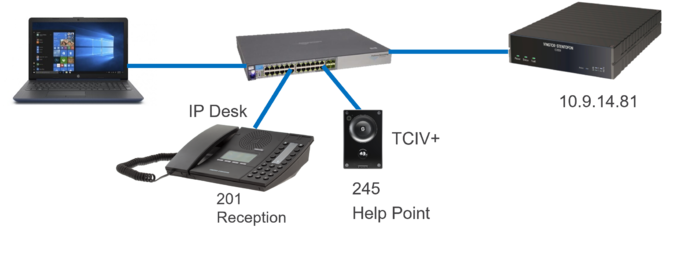
This article describes step by step how to get started with an ICX-AlphaCom system.
With the help of the example visualized in the image to the right, the article will show how to set up an ICX-500 server, a Desktop station and a Help Point/Door intercom.
It also includes how to configure relay for Door Opening and how to set up a Video Intercom (ITSV).
ICX-AlphaCom Web interface
To gain access to the web interface of the ICX-500, connect a laptop to the Eth0 port. Make sure the laptop has an IP address in the 169.254.1.x subnet.
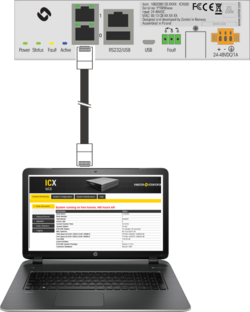
Login
Type in the default IP address 169.254.1.5 in the address field of the browser:

- Default IP address 169.254.1.5
- Default Username: admin
- Default Password: alphaadmin
For more details about the login, see the Logging in section in the ICX Web article.
IP settings
Once logged in, navigate to System Configuration --> Interfaces.

|
Recommended practice is to use Eth0 for system management, and Eth1 for VoIP services. This is the default setup. |
Enter the IP address (typically provided by the customers IT administrator) for Eth1:
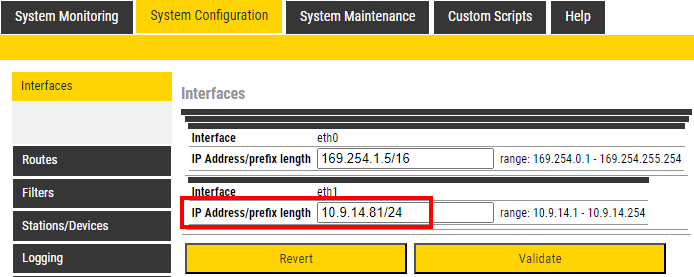
Verify your entry by pressing Validate, then press Save&Apply.
For more details about setting the IP addresses, see the interfaces section in the ICX Web article.
Filter
Navigate to System Configuration --> Filters. In the filter settings all the needed ports are already enabled by default. But to make commissioning easier it is advisable to enable the HTTP port also for Eth1. To ensure security this port can be disabled when commissioning is finished.
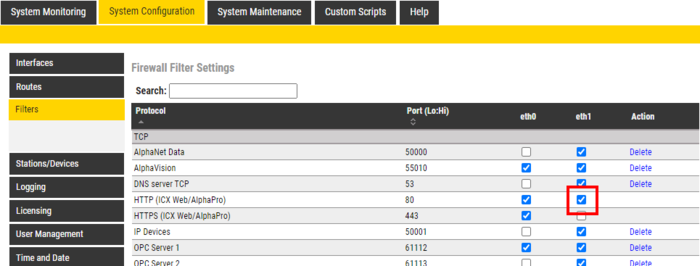
For more details about the firewall, see the Filters section in the ICX Web article.
After the HTTP port is enabled for the Eth1 port, reconfigure the PC to have an IP address in the 10.9.14.x subnet. Then connect both the ICX-AlphaCom's Eth1 and the PC to the network for the remainder of the commissioning.
License
A license file needs to be uploaded. The license file is created in the online application Asset Management System
In order to upload a license file navigate to System Configuration --> Licensing. Browse to the license file and click upload.
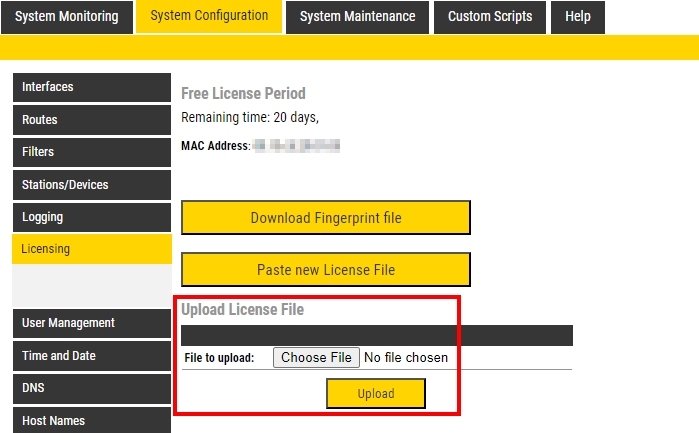
This point can be skipped if the license file is not available at present. The system will then operate in Free License Mode for 20 days.
For more details about setting the licensing, see the Licensing section in the ICX Web article.
Default Gateway (Optional)
If the ICX-AlphaCom and any associated device are on different subnets, a default gateway must be set. Navigate to System Configuration --> Routes and enter the IP address for the gateway in the subnet. Follow up with Validate and Save&Apply.
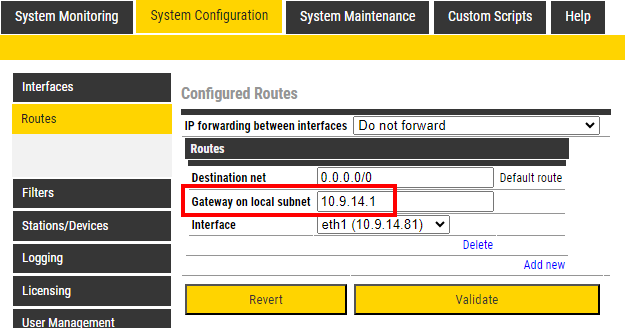
For more details about setting the default gateway, see the Default Gateway section in the ICX Web article.
AlphaPro
The PC application tool AlphaPro must be used to configure the intercom database. The tool can be downloaded from our Downloads section.
Installation
Install AlphaPro on the PC according to this article: AlphaPro - Installation
After the installation start AlphaPro. You will be prompted to create a database. Fill in the needed information:
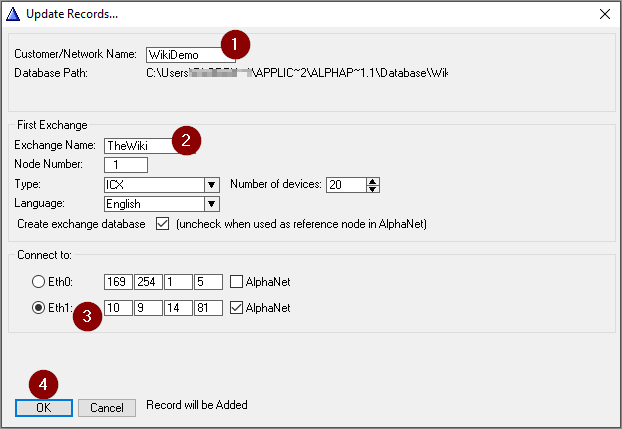
- Give the system a name, this will also be the name of the database. Often this is the name of the customer.
- The server also need a name. Often this name describes the room or building where the server is located.
- Define which IP address the AlphaPro configuration tool shall connect to. Default it points to Eth0. Change this to Eth1, and enter the IP address of Eth1 (same as entered in the Web interface), as shown in the image above.
- Press OK to save.
Configure devices
Start AlphaPro and navigate to the Users&Stations window. The table on the left will show the default directory numbers and display names that are already filled in to the database.
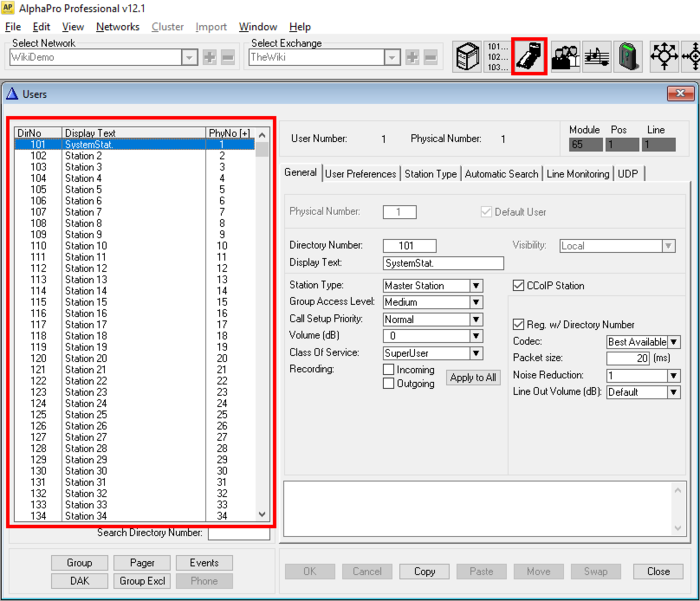
Pick any unused user from the left table and enter settings for the Desktop intercom as highlighted in the image below:
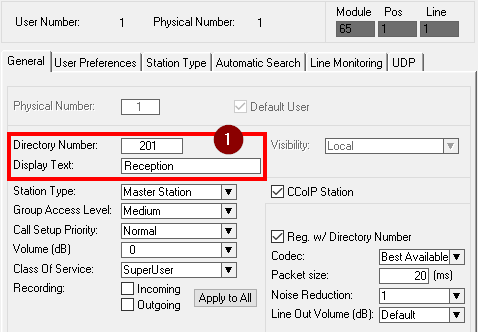
- Set Directory Number and Display Text accordingly.
- Make sure the CCoIP Station flag is checked
- Click OK to save
To configure the Door Station/Help Point, pick the next unused user in the table.
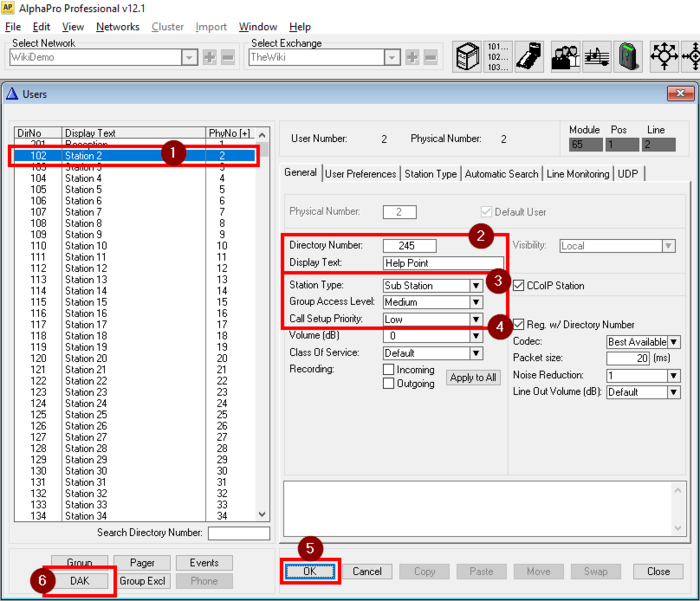
- Highlight the wanted entry to change.
- Set Directory Number and Display Text accordingly.
- Station Type should be set to Sub Station
- Call Setup Priority should be set to Low
- Click OK to save.
- Click the DAK button to open the Call button configuration window:
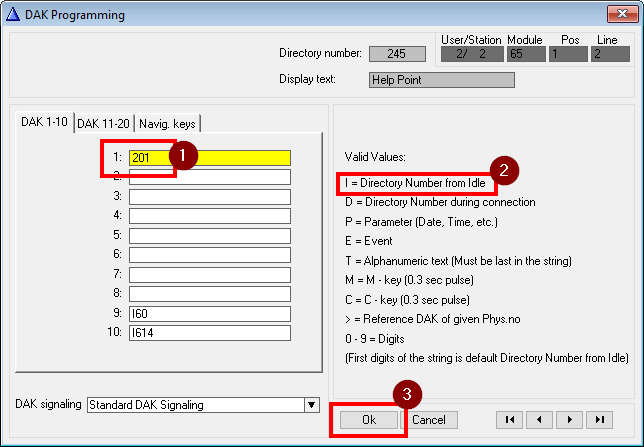
- Enter the number to call when the button on the Door Station/Help Point is pressed.
- The tool will automatically add the capital letter I in front of the number to indicate this number is dialed when the device is in idle mode.
- Save and close the window by clicking the OK button.
Send All
Once all devices are configured in the Users & Stations list, upload the database by clicking the SendAll button. More details can be found here: Communicate (alphaPro)
Door Opening feature (Optional)
A very commonly used feature is the door opening feature. It allows the control the inbuilt relay in the TCIV-3+ by pressing digit 6 during the call..
The settings for the example in this article should be:
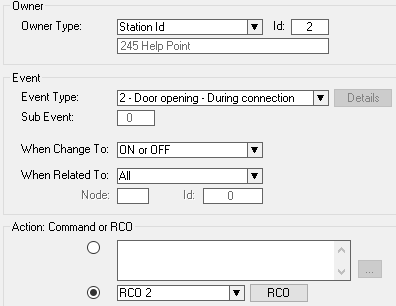
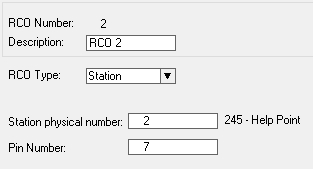
See this article for details: Door Opening - Configuration example.
Finalize the new settings by uploading via the SendAll or Send Change button.
Ringing Group (optional)
If call queuing is required, or to call multiple stations in parallel, the feature Ringing Group Feature should be used.
The settings for the example in this article should be:
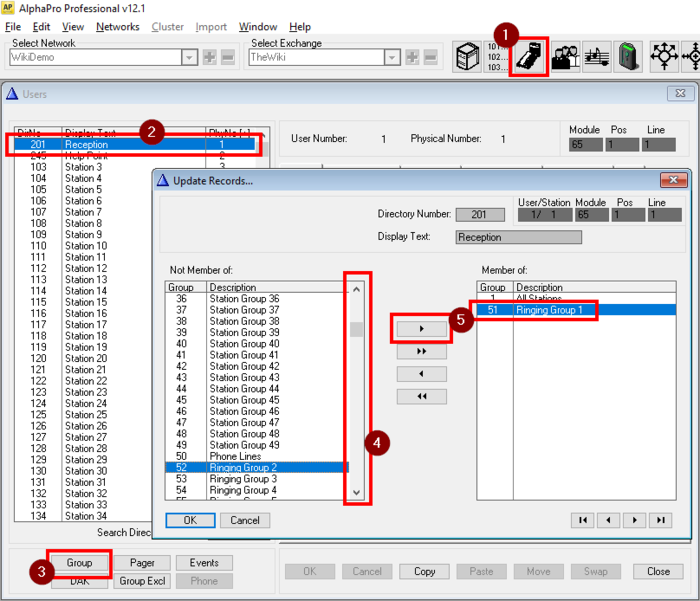
- Enter into the Users&Stations window
- Select the receiver device from the list
- Click the Group button
- In the new window scroll down to locate Ringing Group 1 and highlight it
- Click the right pointing arrow key to move Ringing Group 1 to the Member of: column
- Click OK to save and close.
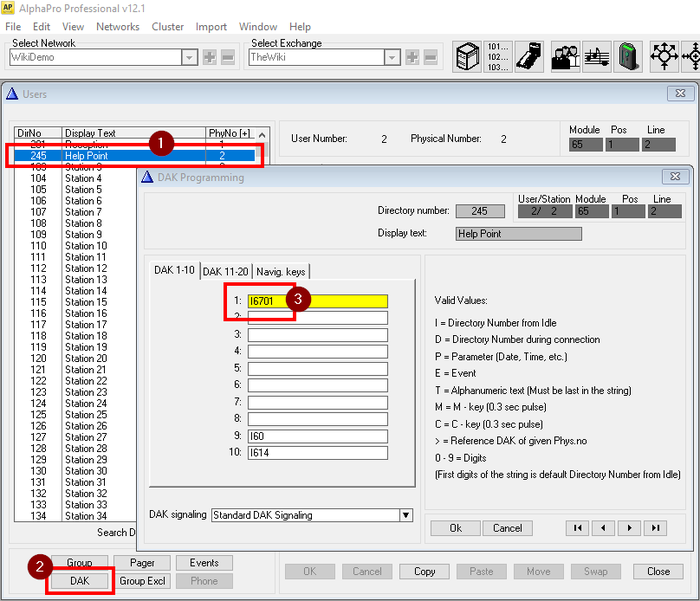
- Select the calling device from the list
- Click the DAK button
- Change the content in line 1 to 6701 (which is the default call number for Ringing Group 1)
- Click OK to save and close.
Finalize the new settings by uploading via the SendAll or Send Change button.
Configuration of the Intercom station
Main Configuration
Log into the Intercom by following this procedure: Logging into an Zenitel IP Device.
The IP Desktop station should be configured as follows:
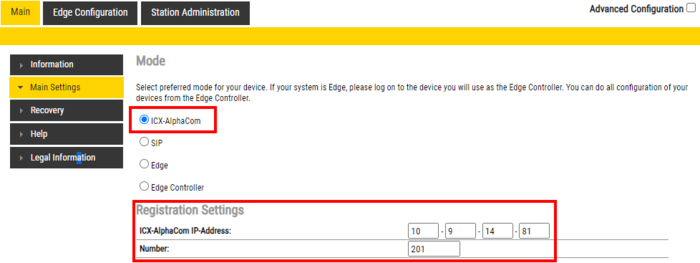
And the Help Point (TCIV-3+) like this:
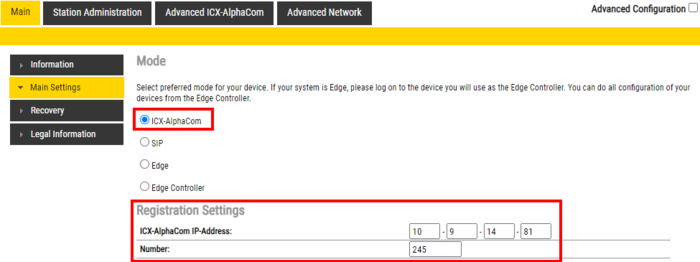
Finalize with Save and Apply. The devices will reboot and register to the ICX-AlphaCom.
More information:
- TCIV-3+
- IP Desk
- Generic configuration of Zenitel Intercom stations are described here: IP Station Configuration - ICX-AlphaCom mode
Video Intercom (Optional)
In order to add video to the system, a Zenitel Device with video monitor is required. In this example we have added an ITSV-5.
Adding ITSV-5 to the AlphaPro database
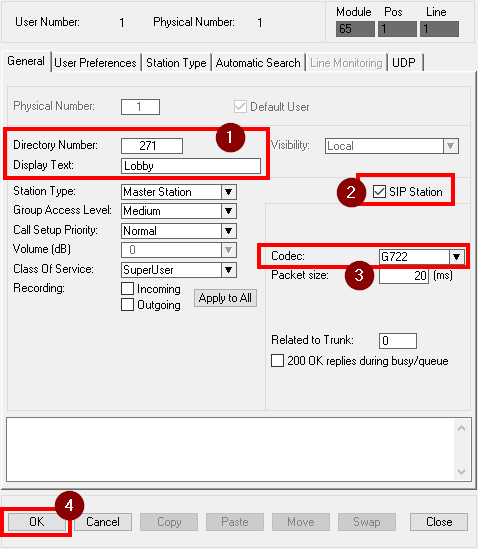
- Set Directory Number and Display Text accordingly.
- Uncheck the CCoIP Station flag and check the SIP Station flag.
- Set codec to G.722.
- Click OK to save.
Upload to the ICX-AlphaCom by clicking Send All or Send Changes.
Main Config - ITSV-5
Log into the ITSV and configure as follows:
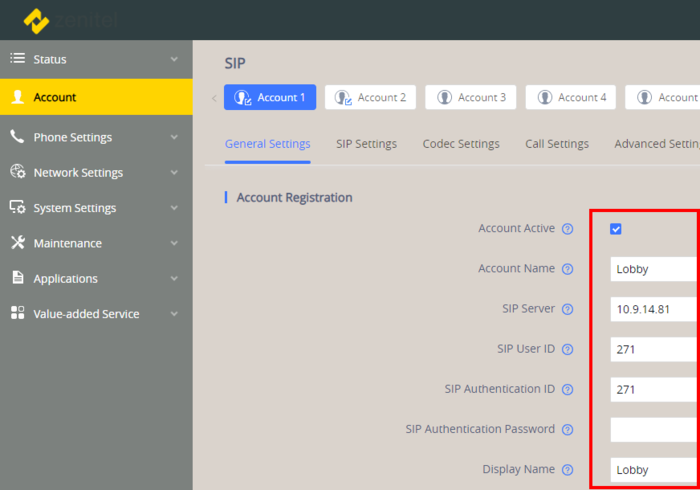
Finalize with Save and Apply. The device will reboot and register to the ICX-AlphaCom.
Read more about ITSV-5 here: ITSV-5 (ICX-AlphaCom)
Video Configuration
In order to stream video from the TCIV-3+ camera to the ITSV-5 screen, there is some additional configuration required. This is described in this article:
