SIP trunk node - configuration
From Zenitel Wiki
The ICX and AlphaCom XE uses the SIP protocol for easy interoperability with telephone systems. Via SIP Trunking the ICX/AlphaCom can be interfaced to:
- Voice gateways (Analogue, GSM, ISDN)
- SIP iPABX
- Call Managers
- Asterisk software PBX
- Tetra radio systems
- ....
This article describes how to configure a SIP Trunk in the ICX/AlphaCom. It is possible to define multiple SIP trunks.
AlphaWeb Configuration
Assign IP address to the ICX/AlphaCom Ethernet Port(s)
Log on to AlphaWeb. In System Configuration -> Interfaces, enter a valid IP address on the Ethernet port. Consult your network administrator to obtain the IP address.
Assign IP routing to the ICX/AlphaCom Ethernet Port(s)
In System Configuration -> Routes, create a Default gateway. This is required if the SIP device and ICX/AlphaCom are on two different networks.
Insert SIP Trunk licenses
In System Configuration -> License key, install the SIP Trunk License.
In case there are multiple SIP Trunk nodes connected to the AlphaCom, the SIP Trunk lines are a common pool of resources for all connected SIP Trunk nodes.
Firewall (filter) settings
In System Configuration -> Filters, enable the SIP and VoIP Audio on the desired Ethernet port (default enabled for Ethernet port 1).
AlphaPro Configuration
Create a SIP Trunk Node
From the AlphaPro main menu, use the ‘+’ button next to the ‘Select Exchange’ dropdown list to create a new exchange. The exchange type must be set to ‘SIP Node’.
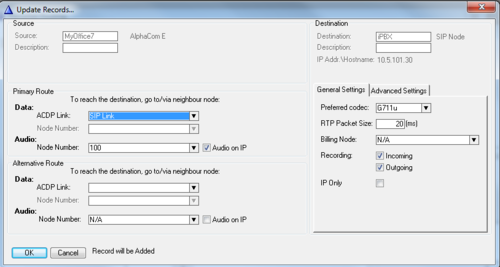
Set the parameters as shown in the figure to the right.
The SIP Trunk line IP address must be identical to the IP address of the SIP gateway or iPBX.
Hostname (optional)
If a hostname is required, check the Host Name checkbox, and enter the required destination hostname.
If hostname is required both for the "destination" domain and the "from" domain, enter “destination.domain;from.domain”, no spaces. (Requires AMC software 11.1.3.5 or newer).
The link between the hostname and the IP address is defined in AlphaWeb, System Configuration - > Hostnames:
Define the AlphaCom to SIP routing
In Exchange & System > Net Routing use the Insert button to create a route between the AlphaCom and SIP device.
- Set ACDP Link = SIP Link
- Node number = The node number used for the SIP Trunk
- Set Preferred codec (G711u is often used) and RTP Packet Size to 20 ms.
Create access numbers
There are different methods for calling out on a SIP trunk:
- Prefix number: Dial Prefix + Phone number. One can choose to send digit by digit (overlap dialing), or collect all digits in the AlphaCom and send the complete phone number with the INVITE message (enbloc dialing)
- Integrated Prefix number: Dial Prefix + Phone number. The prefix will be included as a part of the called telephone number.
- Global number: Dial the phone number without using prefix
- SIP Trunk Station: Dial the phone number without using prefix
It is possible to combine different methods in the same system.
Example: Calling from an AlphaCom station to a SIP user 571234:
The different options calling out on a SIP trunk:
| Dialing method | Dial | Directory No | Feature | Parameter 2 | Comment |
| Prefix (overlap dialing): | 0 + 571234 | 0 | 83 | 0 | Digits are sent one by one from AlphaCom (SIP INFO / RFC4733) |
| Prefix (enbloc dialing): | 0 + 571234 | 0 | 81 | 6 | Collect up to six digits in AlphaCom, then send the complete number (*) |
| Integrated prefix (enbloc dialing): | 57 + 1234 | 57 | 83 | 4 | Collect up to four digits, then send prefix+number as one number (*) |
| Global number (enbloc dialing): | 571234 | 571234 | 83 | 0 | Send the complete number. Maximum 8 digit number. |
| SIP Trunk Station (enbloc dialing): | 571234 | 571234 | 9 | NA | Send the complete number. Maximum 8 digit number. |
(*): Up to 32 digits can be collected before the SIP INVITE is sent. In software version 11.2.3.9 and earlier, the maximum number of digits was 16.
Prefix number (overlap dialing)
When overlap dialing is used (also called "two-stage dialing"), the SIP Device seizes one of the PSTN/PBX lines without performing any dialing, connects the AlphaCom station to the PSTN/PBX, and all further signaling (dialing and Call Progress Tones) is performed directly with the PBX without the SIP device's intervention. The digits are sent to the SIP device either as SIP INFO messages or as RFC4733, depending on the SDP negotiation.
The directory number must be programmed in the AlphaCom directory table with feature 83 and Node = SIP Trunk node number.
Prefix number (enbloc dialing)
When enbloc dialing (also called "one-stage dialing") is used, the digit collection is done in the AlphaCom. The destination phone number is included in the INVITE message from the AlphaCom.
The directory number must be programmed in the AlphaCom directory table with Feature 81 and Node = SIP Trunk node number. In the "Parameter 2" field you must enter the maximum number of digits in a phone number.
When the prefix is dialed, the AlphaCom will wait for more digits. When the number of digits specified in the “Parameter 2" is collected, an INVITE message is sent to the SIP device. If fewer digits are entered, the AlphaCom will send the INVITE after a 3 seconds time out. You can also terminate the digit collection by pressing the M-key. The INVITE message will then be sent immediately.
Dialing examples ("0" is the prefix):
- 0 + 571234: Telephone number 571234 will be called
- 0 + 5712: After a 3 second timeout, telephone number 5712 will be called
- 0 + 5712 + M: Telephone number 5712 will be called
Integrated Prefix number
The directory number must be programmed in the AlphaCom directory table with Feature 83 and Node = SIP Trunk node number. In the field “Parameter 2" you must enter the maximum number of digits in a phone number.
When the prefix is dialed, the AlphaCom will wait for further digits. When the number of digits specified in the "Parameter 2" field is collected, a call setup message is sent to the SIP device. If fewer digits are entered, the AlphaCom will time out after 3 seconds, and the call setup message will be sent. You can also terminate the digit collection by pressing the M-key. The call setup message will then be sent immediately.
Dialing examples ("57" is the prefix):
- 57 + 123456: Telephone number 57123456 will be called
- 57 + 1234: After a 3 second timeout, telephone number 571234 will be called
- 57 + 1234 + M: Telephone number 571234 will be called
Global number
The directory number must be programmed in the AlphaCom directory table with Feature 83 and Node = SIP Trunk node number. The "Parameter 2" field must be "0".
When the global number is dialed, the AlphaCom will send an INVITE message to the SIP device containing the dialed number.
SIP Trunk Station
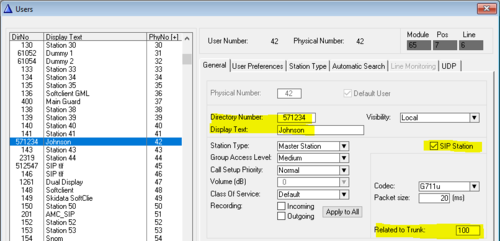
The directory number is programmed in the AlphaCom Users & Stations table. Select a free physical number, and enter Directory Number, Display Text, and enable the flag SIP Station. In the field Related to Trunk, enter the node number of the SIP Trunk on which the call shall be sent.
When the SIP User number is dialed, the AlphaCom will send an INVITE message out on the SIP Trunk containing the dialed number.

|
Notes on using SIP Trunk Station (feature 9) versus Global Number (feature 83):
|
Optional settings
Enbloc dialing - Inter digit timeout
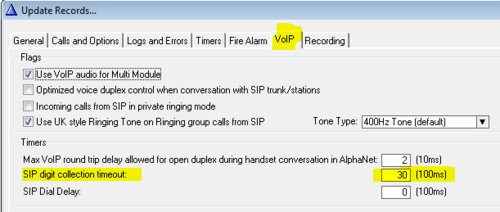
When using enbloc dialing, the AlphaCom will wait for 3 seconds (default) for more digits before the INVITE is sent on the SIP trunk. This timeout time is programmable from AlphaPro. Select Exchange & System > System > VoIP:
Enbloc dialing is used by feature 81 and feature 83 when the field "Parameter 2" is set different from 0.
Overlap dialing - Dial delay
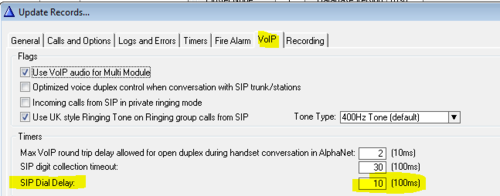
After having made a connection to a SIP gateway, further dialing can be delayed.
A delay might be needed especially if a phone call is made from a DAK key, a substation call button or via Call Forwarding, where the prefix + phone number is programmed on the DAK string, say: 0 P 571234. Some SIP gateways needs a delay after having been accessed in order to detect dial tone from the line and get ready.
In AlphaPro select Exchange & System > System > VoIP:
Timing issues when dialing from DAK keys or substation keys can also be resolved using the Play_DAK_Feature. The Play_DAK_Feature lets you define sequences of dialing, including pauses.
Short numbers
A Short Number is a directory number, normally 2- or 3-digit long, which when called will dial a complete phone number. Short Numbers must be programmed on User Numbers 553-600 in AlphaPro.
Note: Short Number swill work only when the SIP Gateway is configured to use 'one-stage' dialing.
Example:
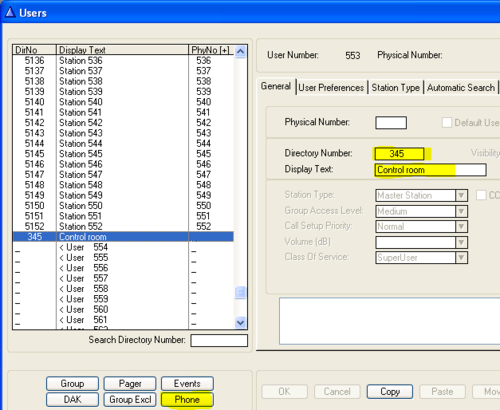
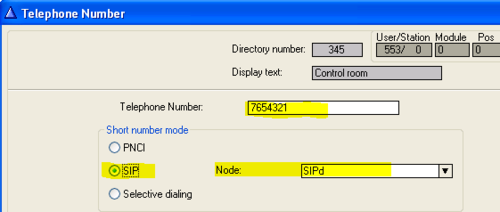
The configuration example below shows how to create a Short Number 345, which will dial phone number 7654321.
- In AlphaPro, open the Users & Stations window, and scroll down in the list box and select a User 553 or higher
- Enter the short number ("Directory Number") and Display text
- Press the button Phone
- Enter the telephone number
- Set "Short number mode" = SIP
- Set "Node" = the SIP trunk node
Phone numbers on DAK Key
DAK keys and Call Buttons can be configured to call a phone number by one key press.
Simple dial pattern:
DAK keys can also be programmed by dialing a code on the station itself: 784 + 0 + 40002547 + M + DAK key
Complex dial pattern:
If there is a need for more complex dial pattern, one can start the DAK sequence with the letter "T":
Description:
- Get line out "01"
- Wait 1 Second
- Dial pin code "123#"
- Wait 2 Seconds
- Dial phone number "40002500"
Address Book:
Telephone numbers in the Turbine Stations with Address Book (TCIS-6, TCIV-6 and TFIE-6):
Optional configuration
Incoming Calls - Force Private Ringing mode
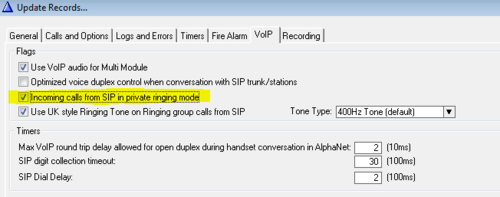
Incoming calls from the SIP Trunk can be forced to be in private ringing mode, independent of the private/open switch of the intercom station.
Check the flag Incoming calls from SIP in private ringing mode in AlphaPro (Exchange & System > System > VoIP).
Incoming Calls - Selective dialing
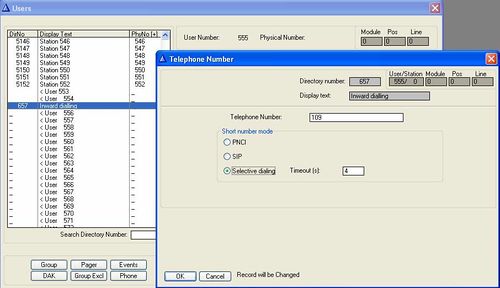
An incoming call from a SIP trunk can be routed to a "Short Number". A dial tone will be heard, and the caller can dial any intercom number, or he can wait a preset time and get connected to a preprogrammed intercom number.
Configuration:
- In AlphaPro, open the Users & Stations window, and scroll down in the list box and select a User 553 or higher
- Enter the short number ("Directory Number") and Display text
- Press the Phone button
- Set Short Number Mode = Selective Dialing
- Timeout: The call will be routed to a preset number if no dialing before this time
- Telephone number: The intercom number to which the call will be routed to after timeout
Incoming Calls - Auto Attendant
The Auto-attendant feature provides voice guided menus for handling incoming calls:
- Play a welcome message on incoming telephone calls
- Press a digit to re-route the call
- If no digits are pressed, the call will be automatically re-routed 5 seconds after the message has finnished playing
The default directory number for the auto-attendant feature is 9550. Incoming calls from the SIP trunk must be routed to this number.
To record a voice message:
- From a SuperUser station dial 8180 + 9550. Press and hold the M-key while recording.
- Example: ”Welcome to Procom Ltd, press 1 for switchboard, press 2 for Sales department, press 3 for Marketing department, or wait for an answer”
- Release M-key to listen to the message. Press M-key again to do a new recording, or
- Press 8 to save
Alternatively a wav-file can be uploaded from the web interface AlphaWeb as described in the Audio Messaging article.
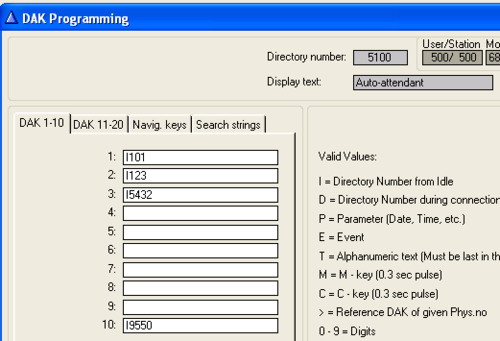
The Auto-attendant number 9550 is using the DAK table of physical station 500 for the "digit" actions. In the Users & Stations window in AlphaPro, select physical number 500 in the list box, and press the button DAK. In the DAK table enter the call destination for digit 1-9 (DAK 1-9), and digit 0 (DAK 10).
If the caller doesn't press any digits within 5 seconds, the call is automatically routed to the intercom number entered in the first entry in the Search Strings tab.
Incoming Calls - Ringing signal on Ringing Group
When an incoming call from a SIP trunk is routed to a Ringing Group, one can choose to have a different ringing signal in the receiving station(s) than the standard Private Ringing signal. This can be useful in order to differentiate external calls from internal calls.
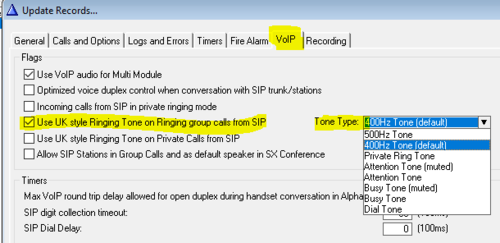
In AlphaPro, Exchange & System > System > VoIP, check the flag Use UK style Ringing Tone on Ringing group calls from SIP, and select which tone to use for the ringing signal. If this flag is unchecked, one will get standard Private Ringing signal.
Incoming Calls - Ringing signal on Private Calls
When an incoming call from a SIP trunk is routed to a station in private mode, one can choose to have a different ringing signal in the receiving station(s) than the standard Private Ringing signal. This can be useful in order to differentiate external calls from internal calls.
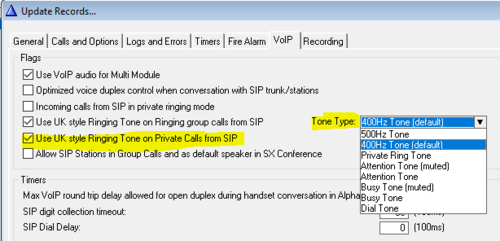
In AlphaPro, Exchange & System > System > VoIP, check the flag Use UK style Ringing Tone on Private Calls from SIP, and select which tone to use for the ringing signal. If this flag is unchecked, one will get standard Private Ringing signal.
Incoming Calls - Group Calls
When activating a group call from SIP trunk, one can use the '*' key on the phone to open the speech path (simulates M-key on), and use the '#' key to close the speech path (simulates M-key off).
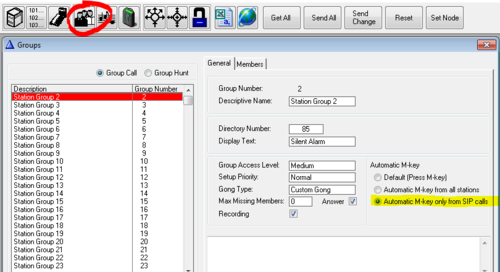
As an alternative, it is possible to open the speech path immediately when the group call number is dialed, without having to press any additional keys on the phone. There is a setting in AlphaPro per group call for this option.
In AlphaPro, Groups > Local Groups, select the group from the list box and enable "Automatic M-key only from SIP calls":
Door Opening Feature
During a conversation between a door station and a telephone, the telephone operator can activate the Door Opening feature in the AlphaCom by pressing digit 6.
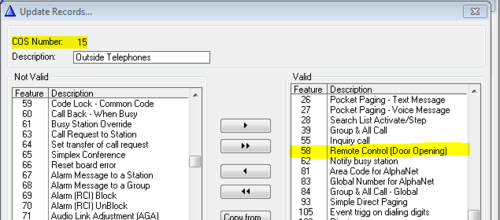
A SIP Trunk is automatically using Class of Service 15. This Class of Service group does not have the option for remote door opening enabled by default. In AlphaPro select the Class of Service button, select number 15 (Outside Telephones), press change and locate feature number 58 in the "Not Valid" list. Highlight Feature 58 and use the single arrow key to move it to the "valid" list.
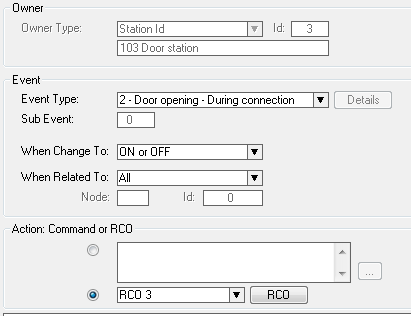
The Door Opening feature is programmed in the Event Handler. When SIP trunk is involved, there are two separate events for the door opening feature, depending on who is the calling side.
Incoming call from the SIP Trunk to the AlphaCom door station:
The Standard door opening event is used:
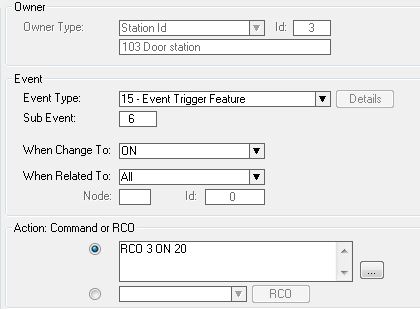
Outgoing call from the AlphaCom door station to an external telephone via the SIP Trunk:
When the phone presses digit 6, the event type Event Trigger Feature (15) is reported, with the digit 6 as sub event. The calling AlphaCom station is Event Owner, and called SIP phone number and node number is Related To. The RCO pulse time is specified as an additional parameter in the RCO action string, i.e. RCO 3 ON 20 means pulse RCO 3 for 2 seconds.
Voice Switching in Noisy Environment
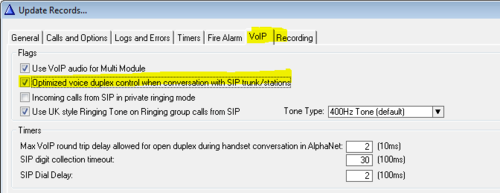
If the intercom station is located in a noisy environment, it might be difficult to switch the voice direction from the telephone towards the intercom station. However, there is a setting in the AlphaCom to overcome this problem. In AlphaPro, Exchange & System > System > VoIP, set the parameter Optimized voice duplex control when conversation with SIP trunk/stations
When this flag is set, the initial voice direction is forced to be from the intercom towards the telephone. When the phone operator starts to speak, the voice direction will switch towards the intercom station, regardless of the level of the audio signal from the intercom station. As soon as the phone operator stops speaking, the voice direction will switch back to the initial direction.
Transmit DTMF signal from AlphaCom
Outgoing calls to SIP trunk
The DTMF signals ‘*’ and ‘#’ will be transmitted to the line when DAK 1 (*) and DAK 2 (#) is pressed during an outgoing telephone conversation. No programming is required.
Incoming calls from SIP trunk
By default digits dialed on an intercom station will be handled locally in the AlphaCom, and not transmitted out on the SIP trunk.
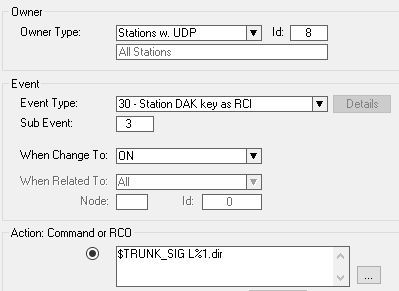
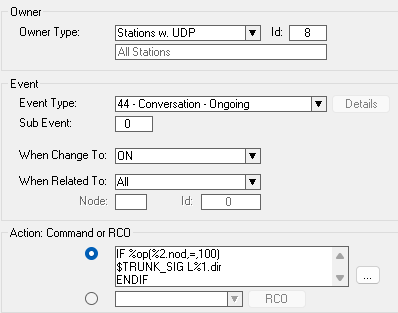
To be able to send DTMF signals to the SIP trunk, one have to set the station in a certain mode by the data command $TRUNK_SIG. The mode can be set either:
- Manually by pressing as DAK key during the call, or
- Automatically when a call is received from the SIP trunk
Manually by pressing a DAK key:
Automatically when receiving a call from the SIP trunk:
In this example the SIP Trunk node is 100, you need to change this according to the node number used.
Note that the data command $TRUNK_SIG requires AMC software 11.5.x.x or newer.
Call Transfer
Incoming calls from SIP Trunk
An incoming call to station A can be transferred to station B:
- Dial 2 (puts call on-hold)
- Dial B's number
- Dial 3 (transfers the call)
Outgoing calls to SIP Trunk
An outgoing phone call from station A can be transferred to station B:
- Press DAK 4, or DAK 9 on an analog ASLT station (turns off transparent mode)
- Dial 2 (puts call on-hold)
- Dial B's number
- Dial 3 (transfers the call)
For more details, see: Transparent Mode DAK-Key Configuration
Monitoring a SIP Trunk
Enable Monitoring of the SIP Trunk
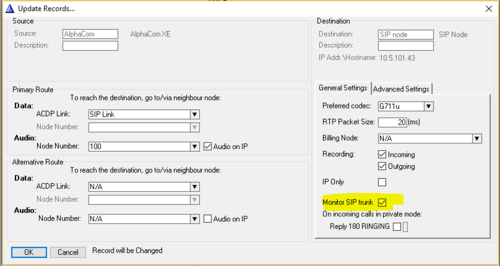
The monitoring of the communication between the AlphaCom and the SIP server must be enabled per SIP trunk. When enabled, the AlphaCom sends a SIP message OPTIONS to the SIP server every 5 seconds. If no response the link is reported down.
The monitoring is enabled from AlphaPro. Open Exchange & System > NetRouting, select the route to the SIP node, and press Change. Enable the flag "Monitor SIP Trunk":
Reporting failure
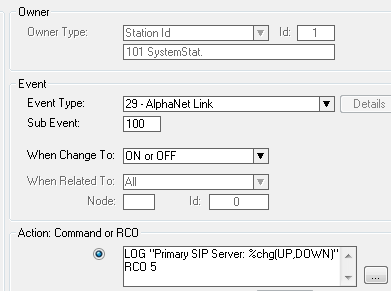
The event 29 - AlphaNet Link is triggered when the communication with a SIP server goes up or down. The "Sub Event" is the SIP Trunk node number.
Example: The following event will report to the System Log and operate RCO 5 when the SIP Server on SIP Trunk node 100 goes up or down:
Software requirement:
- AMC 11.5.3.1 or later
- AlphaPro 11.6.3.9 or later
Failover to redundant SIP server
Failover is switching to a redundant or standby SIP server upon the failure of the primary SIP server. The failover is automatic and operates without warning. The switchover time is less than 5 seconds from a failure of the primary SIP server.
The AlphaCom uses a "heartbeat" message (SIP OPTIONS) to check if the SIP servers are online. As long as the primary SIP server is online, calls will be routed to this server. If the primary SIP server goes off-line, calls will be routed to the secondary server. As soon as the primary server comes back online, calls will be routed to this server again.
Software requirement:
- AMC 11.5.3.1 or later
- AlphaPro 11.6.3.9 or later

|
|
Configure the Failover routing
- Two SIP Trunk nodes must be created in AlphaPro in the "standard" way.
- Monitoring SIP Trunk must be enabled, as described in previous paragraph
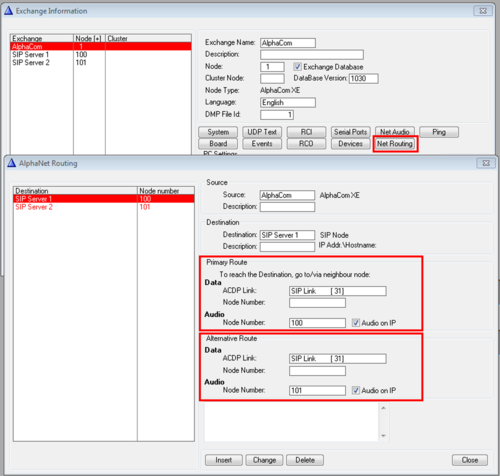
The Failover Routing is defined in the NetRouting Window in AlphaPro. The configuration is best illustrated by an example:
Let's say that you have already created two SIP Trunk nodes:
- SIP Trunk node 100 goes to SIP Server 1
- SIP Trunk node 101 goes to SIP Server 2
In the NetRouting you create the routing from AlphaCom to SIP server 1, and define the SIP server 2 in the "Alternative Route" field:
Now calls that normally goes to SIP Server 1, will automatically be routed to SIP Server 2 if SIP Server 1 is off-line.
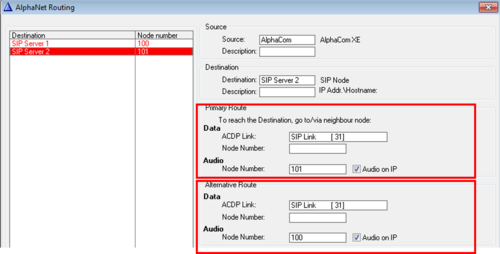
Optionally it is also possible to define the SIP Server 2 as the primary server and Server 1 as the secondary server:
In this case calls that normally goes to SIP Server 2, will be routed to SIP Server 1 if SIP Server 2 is off-line.
Failover routing if all voice channels are busy
A call can be routed to the secondary SIP trunk if all available voice channels to the primary SIP trunk is in use.
This can be useful e.g. if one want to expand the traffic capacity by adding one more SIP gateway (e.g. AudioCodes MP114). When all channels on the first gateway is in use, the call can automatically be routed to the second gateway.
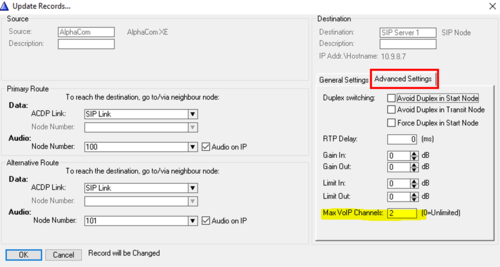
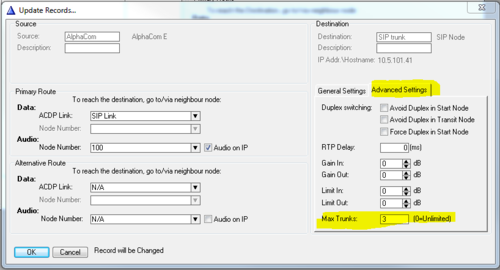
One have to define the maximum VoIP channels that is available for the primary SIP Trunk: Select Exchange & System -> NetRouting in AlphaPro. Press the Change button, and select the Advanced Settings tab. In the field Max VoIP Channels, enter the number of voice channels this trunk have access to.
In the example above there will be maximum two voice calls via SIP Trunk node 100. A third call will be routed to trunk node 101.
Multiple nodes in AlphaNet sharing SIP Trunking
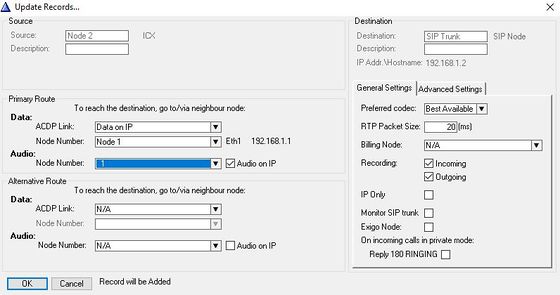
When sharing one SIP Trunk node with one or more ICX-AlphaCom nodes in AlphaNet, the Net Routing must be configured to use the connected node as a Transit Node. Access numbers should reference the SIP Trunk node when using Feature 81/83
In this example, Node 2 must be configured with a route to Node 100 via Node 1
About VoIP Audio Channels
Call capacity
The overall maximum call capacity on SIP trunk calls are as follows:
- Maximum outgoing conversations: 16
- Maximum incoming conversations: 32
The actual number of simultaneous calls are limited by the SIP license installed.
SIP trunk calls are using resources from a common pool of VoIP channels, which is also used by other VoIP services, such as AlphaNet calls and MultiModule calls. In addition to the limit set by the SIP license, the maximum number of simultaneous SIP trunk calls will also depend on other VoIP traffic currently active in the system.
When the call is to/from analog ASLT stations, the number of simultaneous calls in handsfree mode (loudspeaking) is limited by the number of speech channels available. There is one speech channel per ASLT board.
When the call is to/from analog ASLT or ATLB stations, the number of simultaneous handset (lowspeaking) calls is 10, limited by the number LEC resources.
Reserving VoIP channels for a SIP trunk
The SIP Trunk lines are a common pool of resources for all connected SIP Trunk nodes. The VoIP channels used by SIP Trunk(s) are assigned dynamically. However, it is possible to reserve one or several of the VoIP channels for a specific SIP trunk. In this way one can make sure that there will always be VoIP channels available to this trunk.
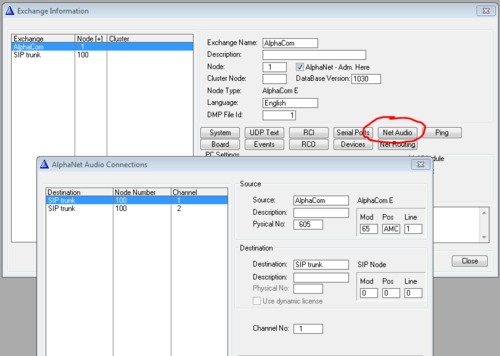
The VoIP channels have virtual physical numbers in the AlphaCom, starting from 605 to 634. To reserve a VoIP channel for a SIP Trunk, select Exchange & System -> NetAudio in AlphaPro. Press Insert, and select the SIP trunk from the list of nodes. Now enter the physical number of the VoIP channel, i.e. a number between 605 to 634. It is good practice to start with 605 and go upwards.
The SIP trunk with reserved VoIP channels will still have access to the other free VoIP channels available according to the SIP Trunk license.
Limiting the number of VoIP channels used by a SIP Trunk
The SIP Trunk license sets the overall limit on how many simultaneous calls that can be made on SIP trunks. In addition to this, it is possible to set further limits on how many VoIP channels a specific SIP Trunk should be able to use. This could be useful if there are multiple SIP trunks, and one might want to set restrictions on how many VoIP channels one particular trunk can use.
To set the maximum VoIP channels that should be available for a SIP Trunk, select Exchange & System -> NetRouting in AlphaPro. Press the Change button, and select the Advanced Settings tab. In the field Max Trunks (or Max VoIP Channels), enter the number of VoIP channels this trunk should have access to.
Priority mechanism for dedicated stations
When "Max Trunks" are specified, and a call is made and there are no more free VoIP channels, you will get a busy tone. It is possible to Camp On, and wait for the SIP trunk to become free.
Stations with Call Setup Priority = Alarm will get a forced connection to the SIP trunk. This is sufficient to disconnect the ongoing conversation on the SIP trunk line.
Two more setting must be done if you want the user with alarm call setup to take over the SIP trunk line.
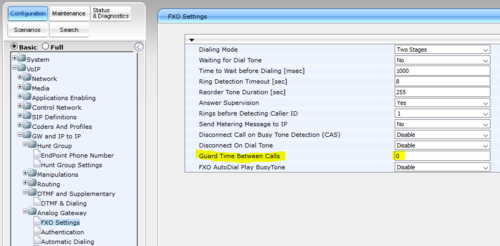
In the Audiocodes gateway, set "Guard time between calls" to zero. Default is 1:
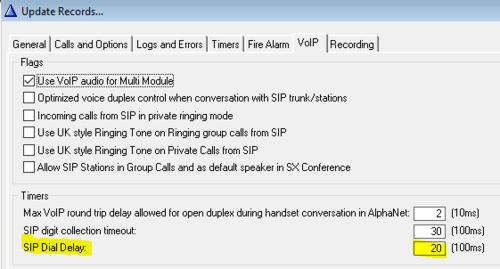
In AlphaPro -> Exchange & System -> VoIP, change SIP Dial Delay to 20 (2 sec). Default is zero:
Additional information
UDP Group on incoming calls
Incoming SIP Trunk calls are by default using UDP Groups 1 and 8. This is hardcoded, and cannot be changed.
Change UDP port number from 5060
The default UDP port number 5060 used for SIP comminication can be changed in the AMC-IP memory, either by using the NVRAM editor from the TST console or by using the $SNV command in Event Handler.
.ex_profile.ip_config.sip_data = 5060
|
A small reset of the AlphaCom is required for the change to take effect.
Remember to define and open the new port in the Filters settings in AlphaWeb.
Related articles
- %tin : The %tin macro can be used in the Event Handler. It returns the current number of trunk channels used towards a specific trunk
- Play_DAK_Feature: Define sequences of dialing, including pauses


