Difference between revisions of "Station Web Interface - ICX-AlphaCom mode"
From Zenitel Wiki
(→Audio) |
|||
| (13 intermediate revisions by 2 users not shown) | |||
| Line 1: | Line 1: | ||
{{AI}} | {{AI}} | ||
| − | [[File:ICX and stations.png|thumb| | + | [[File:ICX and stations.png|thumb|400px|ICX-AlphaCom Intercom System]] |
This article describes the various settings available through the web interface of Zenitel IP Stations when operating with an '''ICX-AlphaCom''' or '''AlphaCom XE''' server. | This article describes the various settings available through the web interface of Zenitel IP Stations when operating with an '''ICX-AlphaCom''' or '''AlphaCom XE''' server. | ||
| Line 16: | Line 16: | ||
====Main Settings==== | ====Main Settings==== | ||
* Click '''Main > Main Settings''' to access the page for configuring station mode and IP parameters. | * Click '''Main > Main Settings''' to access the page for configuring station mode and IP parameters. | ||
| − | [[File: | + | [[File:ICX Main.PNG|thumb|left|700px|The '''Main Settings''' page]] |
<br style="clear:both;" /> | <br style="clear:both;" /> | ||
'''Station Mode:''' Select the '''Use ICX-Alphacom''' radio-button. | '''Station Mode:''' Select the '''Use ICX-Alphacom''' radio-button. | ||
| − | |||
| − | |||
'''Registration Settings:''' | '''Registration Settings:''' | ||
| Line 39: | Line 37: | ||
*'''Read IP Address:''' Check the '''Read IP Address''' box to enable an unregistered station to speak the IP address when the call button is pressed. "Read IP Address" is default enabled. | *'''Read IP Address:''' Check the '''Read IP Address''' box to enable an unregistered station to speak the IP address when the call button is pressed. "Read IP Address" is default enabled. | ||
| − | |||
*'''Disable Reset to Factory default settings using frontboard and I/O''' (not available on all models): Check this option to avoid unwanted or accidental initiation of the factory reset procedure from an input or button. | *'''Disable Reset to Factory default settings using frontboard and I/O''' (not available on all models): Check this option to avoid unwanted or accidental initiation of the factory reset procedure from an input or button. | ||
| − | |||
*'''Enable RSTP''' (not available on all models): Check the '''Enable RSTP''' box to enable RSTP. RSTP is only required when using redundant networking | *'''Enable RSTP''' (not available on all models): Check the '''Enable RSTP''' box to enable RSTP. RSTP is only required when using redundant networking | ||
| − | |||
*'''Ethernet Speed 10 Mbits/s''' (not available on all models): Default Ethernet speed is 100 Mbit/s unless switch is configured to 10 Mbit/s | *'''Ethernet Speed 10 Mbits/s''' (not available on all models): Default Ethernet speed is 100 Mbit/s unless switch is configured to 10 Mbit/s | ||
| − | + | *'''IGMP Version [INCA and IMX6 stations (Desktop v2, IP Flush v2 and IP-CROR v2) only]:''' Select IGMPv2 or IGMPv3 for multicast group membership. | |
Click '''Save''' followed by '''Apply''' to apply the new configuration settings. | Click '''Save''' followed by '''Apply''' to apply the new configuration settings. | ||
| Line 79: | Line 74: | ||
=== Advanced ICX-AlphaCom tab=== | === Advanced ICX-AlphaCom tab=== | ||
| − | ==== | + | ====Audio Settings ==== |
| − | + | See article: [[Audio Settings (Devices)]] | |
| − | |||
| − | |||
| − | |||
| − | |||
| − | |||
| − | |||
| − | |||
| − | |||
| − | |||
| − | |||
| − | |||
| − | |||
| − | |||
| − | |||
| − | |||
| − | |||
| − | |||
| − | |||
| − | |||
| − | |||
| − | |||
| − | |||
| − | |||
| − | |||
| − | |||
| − | |||
| − | |||
| − | |||
| − | |||
| − | |||
| − | |||
| − | |||
| − | |||
| − | |||
| − | |||
| − | |||
| − | |||
| − | |||
| − | |||
| − | |||
| − | |||
| − | |||
| − | |||
| − | |||
| − | |||
| − | |||
| − | |||
| − | |||
| − | |||
| − | |||
| − | |||
| − | |||
| − | |||
| − | |||
| − | |||
| − | |||
| − | |||
| − | |||
| − | |||
| − | |||
| − | |||
| − | |||
| − | |||
| − | |||
| − | |||
| − | |||
| − | |||
| − | |||
| − | |||
| − | |||
| − | |||
| − | |||
| − | |||
| − | |||
| − | |||
| − | |||
| − | |||
| − | |||
| − | |||
| − | |||
| − | |||
| − | |||
| − | |||
| − | |||
| − | |||
| − | |||
| − | |||
| − | |||
| − | |||
| − | |||
| − | |||
| − | |||
| − | |||
| − | |||
| − | |||
| − | |||
| − | |||
| − | |||
| − | |||
| − | |||
| − | |||
| − | |||
| − | |||
| − | |||
| − | |||
| − | |||
| − | |||
| − | |||
| − | |||
| − | |||
| − | |||
| − | |||
| − | |||
| − | |||
| − | |||
| − | |||
| − | |||
| − | |||
| − | |||
| − | |||
| − | |||
| − | |||
| − | |||
| − | |||
| − | |||
| − | |||
| − | |||
| − | |||
| − | |||
| − | |||
| − | |||
| − | |||
| − | |||
| − | |||
| − | |||
| − | |||
| − | |||
| − | |||
| − | |||
| − | |||
| − | |||
| − | |||
| − | |||
| − | |||
| − | |||
| − | |||
| − | |||
| − | |||
| − | |||
| − | |||
| − | |||
| − | |||
| − | |||
| − | |||
| − | |||
| − | |||
| − | |||
| − | |||
==== DAVC Settings ==== | ==== DAVC Settings ==== | ||
| Line 256: | Line 93: | ||
<br style="clear:both;" /> | <br style="clear:both;" /> | ||
| − | * | + | For each of the six I/O pins the options are: |
| + | * '''Input''' (default) | ||
| + | * '''Input NC''' ("NC - Normally closed". Available from firmware 8.1.3.0) | ||
| + | * '''Output''' | ||
| + | |||
See also the article [[Turbine Inputs and Outputs in ICX-AlphaCom]]. | See also the article [[Turbine Inputs and Outputs in ICX-AlphaCom]]. | ||
| Line 265: | Line 106: | ||
Read more about [[Sound Detection]]. | Read more about [[Sound Detection]]. | ||
| − | ==== RTSP | + | ==== RTSP and ONVIF (Non video intercoms) ==== |
| − | [[ | + | '''RTSP Settings''': see [[RTSP_Settings#Non-Video_Intercoms|RTSP Settings for Non-Video Intercoms]] |
| − | |||
| − | + | '''ONVIF Settings''': see [[ONVIF_Settings#Non_Video_Intercoms|ONVIF Settings for Non-Video Intercoms]] | |
| − | |||
| − | |||
| − | |||
| − | |||
==== Video Settings ==== | ==== Video Settings ==== | ||
| + | See article [[Video Settings]] on how to set parameters for the camera and stream options. | ||
==== Advanced Video Settings ==== | ==== Advanced Video Settings ==== | ||
| − | + | '''RTSP Settings''': see [[RTSP_Settings#Video_Intercoms|RTSP Settings for Video Intercoms]] | |
| + | |||
| + | '''ONVIF Settings''': see [[ONVIF_Settings#Video_Intercoms|ONVIF Settings for Video Intercoms]] | ||
====OLED Labels==== | ====OLED Labels==== | ||
| Line 323: | Line 162: | ||
[[Category: Turbine Configuration]] | [[Category: Turbine Configuration]] | ||
| + | [[Category: ICX-AlphaCom Platform]] | ||
Latest revision as of 13:26, 12 January 2024


This article describes the various settings available through the web interface of Zenitel IP Stations when operating with an ICX-AlphaCom or AlphaCom XE server.
Contents
- 1 The station web interface
- 1.1 Main tab
- 1.2 Station Administration tab
- 1.3 Advanced ICX-AlphaCom tab
- 1.3.1 Audio Settings
- 1.3.2 DAVC Settings
- 1.3.3 Offline Relays
- 1.3.4 I/O Settings
- 1.3.5 Sound Detection
- 1.3.6 RTSP and ONVIF (Non video intercoms)
- 1.3.7 Video Settings
- 1.3.8 Advanced Video Settings
- 1.3.9 OLED Labels
- 1.3.10 Address Book
- 1.3.11 Keyboard Settings
- 1.3.12 Time Settings
- 1.3.13 Audio Messages
- 1.3.14 Tone Test
- 1.4 Advanced Network tab
The station web interface
Station Web images and description in this article is based on the latest released software version.

|
The menus and parameters displayed may vary depending on the station type (e.g. Compact, Industrial or Ex). |
Main tab
Information
- Log In to the station
- The Information page will now be displayed, showing the IP station configuration and status.

Main Settings
- Click Main > Main Settings to access the page for configuring station mode and IP parameters.

Station Mode: Select the Use ICX-Alphacom radio-button.
Registration Settings:
- ICX-AlphaCom IP-address: Enter the IP address of the ICX-AlphaCom server to which the IP station is to be registered
- Number: Enter the directory number of the station. This must match the directory number defined in the ICX-AlphaCom server
- - If a directory number is not entered, the station will register with its MAC address. The MAC address is found on the Station Information page and needs to be entered in the ICX-AlphaCom server using the AlphaPro PC tool
IP Settings:
- DHCP – Select this option if the IP station shall receive IP Settings from a DHCP server.
- Static IP – Select this option if the IP station shall use a static IP address. Enter values for:
- - IP-address
- - Subnet-mask
- - Gateway
- - DNS Server 1 (option for network administration, not used in ICX-AlphaCom mode)
- - DNS Server 2 (option for network administration, not used in ICX-AlphaCom mode)
- - Hostname (option for network administration)
- Read IP Address: Check the Read IP Address box to enable an unregistered station to speak the IP address when the call button is pressed. "Read IP Address" is default enabled.
- Disable Reset to Factory default settings using frontboard and I/O (not available on all models): Check this option to avoid unwanted or accidental initiation of the factory reset procedure from an input or button.
- Enable RSTP (not available on all models): Check the Enable RSTP box to enable RSTP. RSTP is only required when using redundant networking
- Ethernet Speed 10 Mbits/s (not available on all models): Default Ethernet speed is 100 Mbit/s unless switch is configured to 10 Mbit/s
- IGMP Version [INCA and IMX6 stations (Desktop v2, IP Flush v2 and IP-CROR v2) only]: Select IGMPv2 or IGMPv3 for multicast group membership.
Click Save followed by Apply to apply the new configuration settings.
Recovery
- Click Main > Recovery to access the page for recovery functions.

- Reboot system: Perform a full Linux reboot. No configuration is lost
- Reboot main application: Perform a restart of the intercom application. No configuration is lost
- Factory reset: Set all parameters to Factory Default values. The station will get static IP Address 169.254.1.100.
- Factory reset with DHCP: Set all parameters to Factory Default values. The station will get IP Address from DHCP server. If no DHCP server in the network, it will get a random 169.254.x.x IP address.
- Clear local ZAP profile: For special purpose
- Delete ZAP data.lua: For special purpose
Station Administration tab
Change Password
The password for web access and for accessing the display setup menus can be changed, see Password (IP Stations).
Manual Upgrade
The software of the station can be upgraded via the web interface. See Turbine_Software_Upgrade for details.
- Manual Upgrade - Available options depend on station type
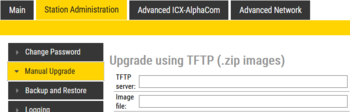
Upgrade in Turbine Compact and Turbine Extended using external TFTP server
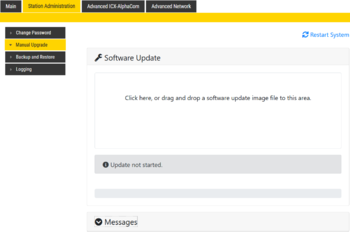
Upgrade in TCIV+ and IP Desk V2/IP Flush V2 using Drag&Drop .swu file


Backup and Restore
From the web interface of the station it is possible to backup and restore the configuration data. See Backup and Restore for more information.
Logging
From the web interface of the station it is possible to activate logging, which can be useful for debugging and troubleshooting purposes. See Logging - IP Stations for more information.
Advanced ICX-AlphaCom tab
Audio Settings
See article: Audio Settings (Devices)
DAVC Settings
The Distributed Automatic Volume Control (DAVC) is an algorithm which is using one or more microphones ("AVC Source") to measure the ambient audio/noise level, and adjusts the loudspeaker output level of the PA amplifier ("AVC Receiver") according to the ambient audio level.
See the article Distributed Automatic Volume Control (DAVC) for details about this feature.
Offline Relays
Fallback mechanism that makes it possible to designate one input/dak per relay which will activate the relay on press, and deactivate on release when the ICX-AlphaCom is offline

I/O Settings
These settings let you choose if an I/O should be used as an Input or as an Output. By default all I/O's are set as Inputs.
- Select Advanced ICX-AlphaCom > I/O Settings from the menu

For each of the six I/O pins the options are:
- Input (default)
- Input NC ("NC - Normally closed". Available from firmware 8.1.3.0)
- Output
See also the article Turbine Inputs and Outputs in ICX-AlphaCom.
Sound Detection
The Sound Detection, also known as Voice Activity Detection (VAD) samples the audio level from the microphone located in the IP Station. If the audio level meets defined criterias an action in ICX-AlphaCom can be triggered.
Read more about Sound Detection.
RTSP and ONVIF (Non video intercoms)
RTSP Settings: see RTSP Settings for Non-Video Intercoms
ONVIF Settings: see ONVIF Settings for Non-Video Intercoms
Video Settings
See article Video Settings on how to set parameters for the camera and stream options.
Advanced Video Settings
RTSP Settings: see RTSP Settings for Video Intercoms
ONVIF Settings: see ONVIF Settings for Video Intercoms
OLED Labels
See article OLED Labels on how to configure the display in the station models TCIS-4 and TCIS-5.
Address Book
See the article Address Book on how to configure the address book of the station models TCIS-6 and TCIV-6/TCIV-6+.
Keyboard Settings
Applies to the station models TFIE-x (Industrial station) and TFIX-x (Explosion proof station). See article TFIE Keyboard Settings for more details.
Time Settings
- Select Advanced ICX-AlphaCom > Time Settings from the menu

Time Settings: You can enable Network Time Protocol, select the time zone and set the hostname or the IP address of the NTP server.
Audio Messages
A Turbine station can play a custom media (WAV) file when connection to the ICX-AlphaCom server is lost. The station can also play a custom media file when pressing the call button (or activating an input) and the call setup fails because the station is offline. See Audio Messages - Turbine for more detasils.
Tone Test
- Select Advanced ICX-AlphaCom > Tone Test from the menu

Read more about tone test in ICX-AlphaCom here: Line_monitoring#Tone_test
Advanced Network tab
SNMP
A set of SNMP functions are available in the IP station. SNMP (Simple Network Management Protocol) is a protocol for centralizing the management of devices in IP networks.
See SNMP in IP Stations for futher information.
802.1X
IEEE 802.1X is an IEEE Standard for port-based Network Access Control (PNAC). It provides an authentication mechanism to devices wishing to attach to a LAN, either establishing a point-to-point connection or preventing it if authentication fails. For details on configuration, see IEEE 802.1X.
VLAN
VLAN is not applicable for the Turbine series. Only for IP Desk Master -V2, IP Flush Master -V2 and the INCA family. See article VLAN Tagging (IEEE 802.1Q) for details.
Firewall
All IP Stations have an embedded firewall. See Firewall for details.